Short answer
How do you create labels in Gmail?
1. Click the setting icon on the right, select all settings.
2. Scroll down, then select labels you want to add
3. Click Create new label.
4. Name your label.
5. Click Create.
Using labels for Gmail can keep your mailbox looking clean and make it easy to find items. Gmail powers seamless communication with clients. However, it can at times feel overwhelming when you have hundreds, if not thousands, of emails in your Gmail inbox without any order.
This article will teach you how to use Gmail labels to organize your inbox by using labels in Gmail.
If you are also an Outlook user: we have prepaid a separate post for how to organize your emails in Outlook in a few simple steps.
Labels vs. folders in Gmail
The difference between Gmail labels and folders is that Gmail only uses labels, not folders. The reason for the mixup is that many people are familiar with “Folder” in Outlook, so they look in Gmail for what they know, and for good reason. Labels are the same as Folders, except that labels in Gmail do much more than folders Outlook, like adding colors and applying more than one label to the same email.
What are Gmail Folders
Labels are tags that you add to your emails to keep them organized in a certain way. You can use any name and color for the labels as you desire. You can apply several labels to a single email and find the email by choosing any of the labels. Whenever you create a new label, it adds to the left panel. Scroll through to choose what you are looking for.
What are labels used for in Gmail?
Gmail labels are used as tags that you can add to each email that comes in or that you send. You can also add the labels to drafts. The idea behind labels is to help keep your inbox organized. They are similar to folders. However, as opposed to folders, you can incorporate labels to more than a single message. Besides helping you become organized and being able to sort email in Gmail, labels also make it easy to find certain emails.
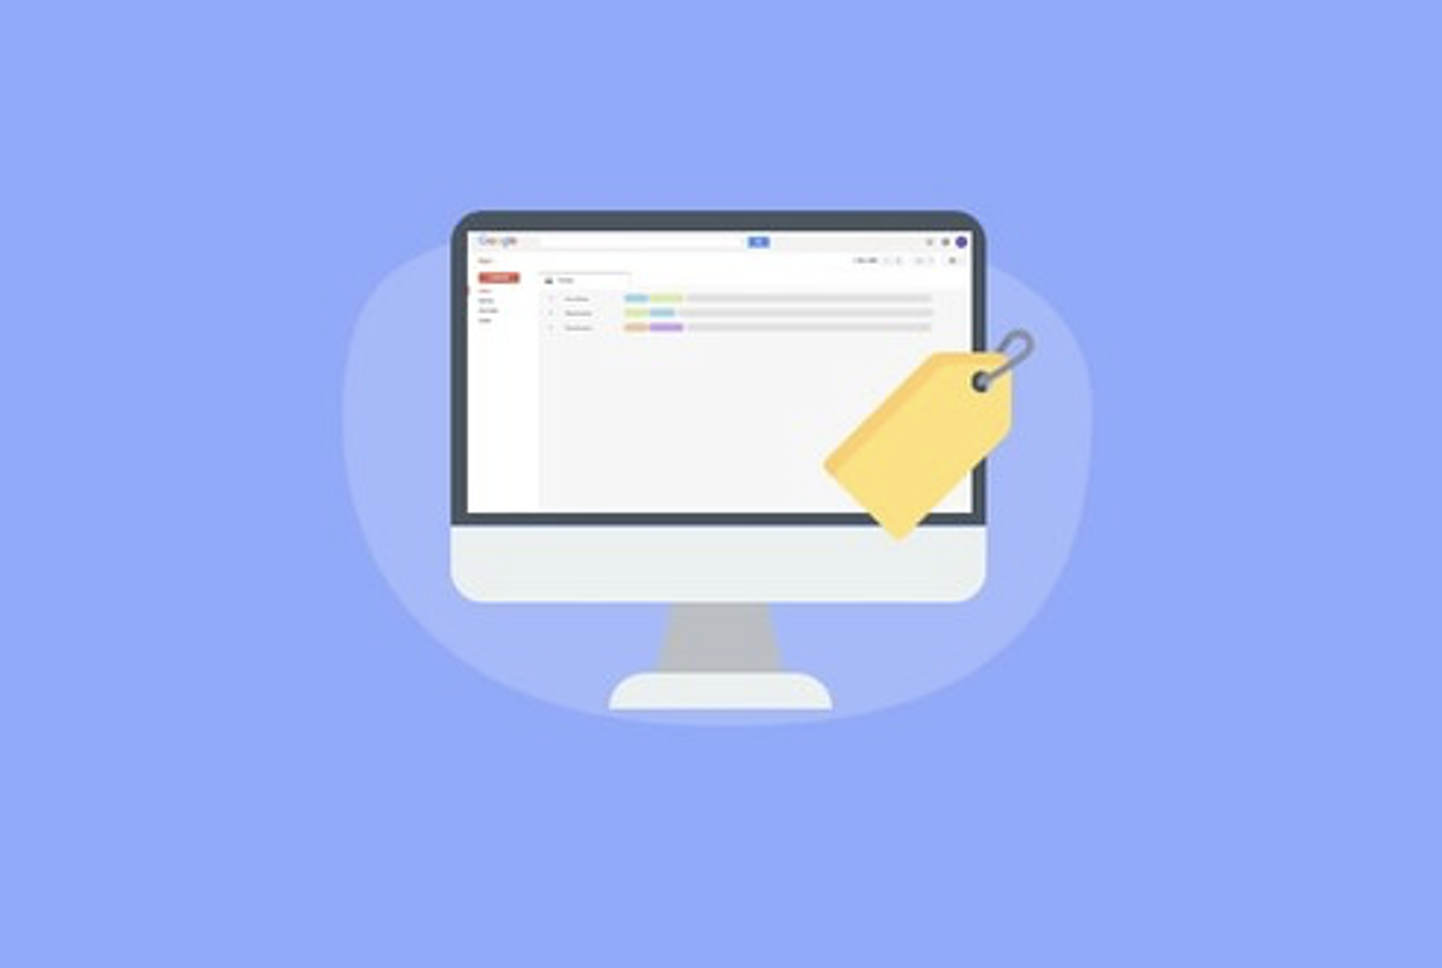
How to use labels Gmail
By creating and using labels in Gmail, your inbox will stop controlling you, and each message that comes in will be organized and sorted. You can create labels for Gmail in a few clicks by using the steps shown below (should take about 2:40 minutes)
if you’re having trouble creating new labels, see our troubleshooting for this problem below.
Create a labels in Gmail
1. Go to Settings, the gear icon on the top right, click see all settings.
From the top right-hand side, click on the gear icon and choose “See all settings” to navigate to the Settings page.
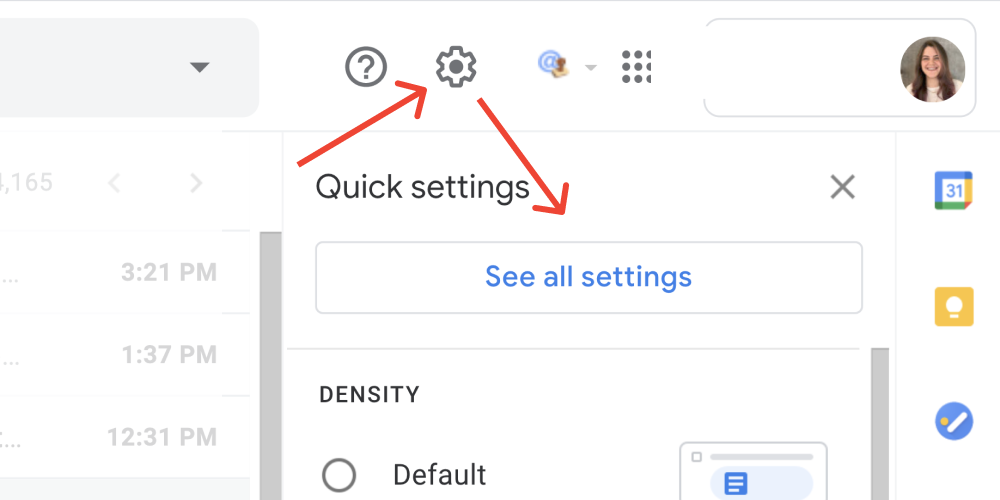
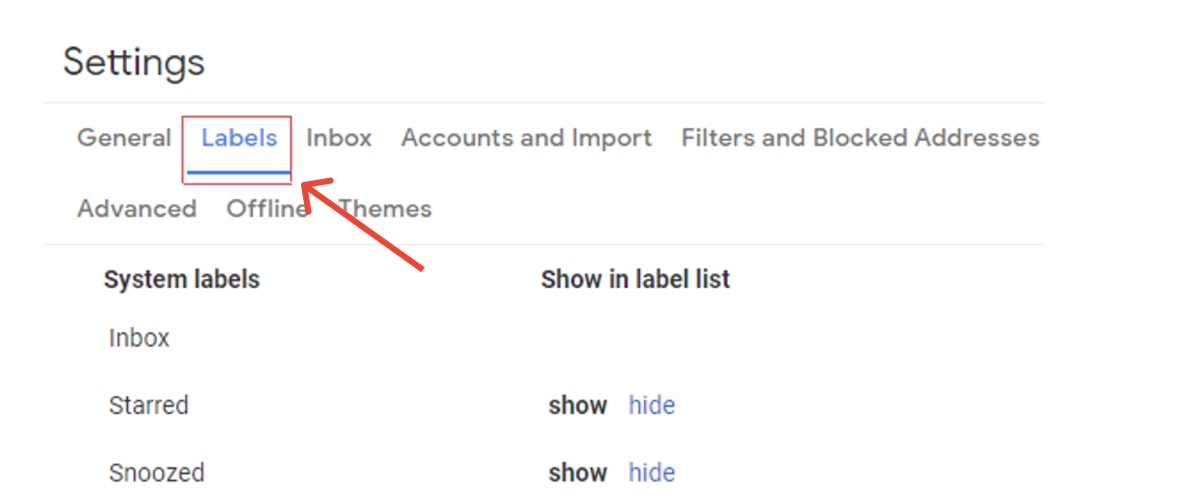
2. Click the labels menu item. It’s next to general
The labels menu item allows you to see at first glance all the pre-existing labels. The default system labels that you will see include the Inbox label and Starred label, among others.
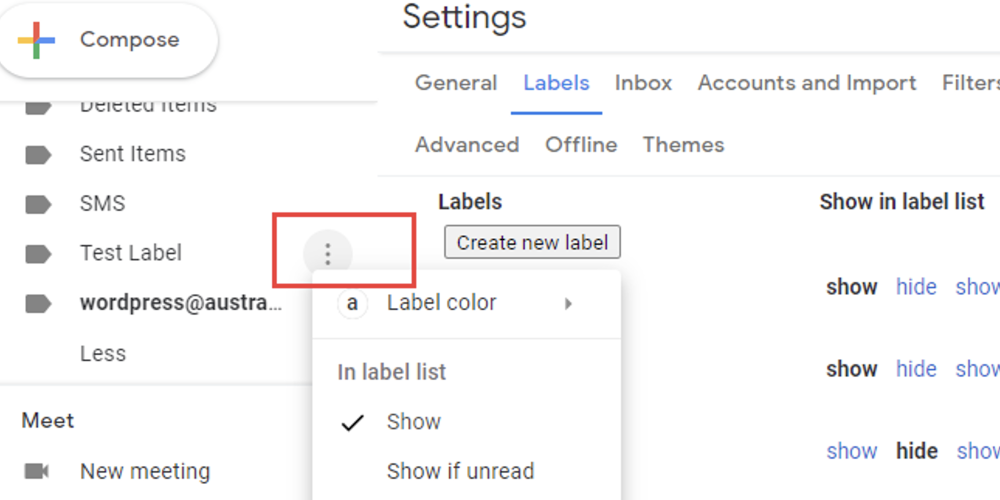
3. Scroll down the page and click on the Create new label button
To create a personally customized label, you will need to scroll down this page until you reach the “Create new label” section.
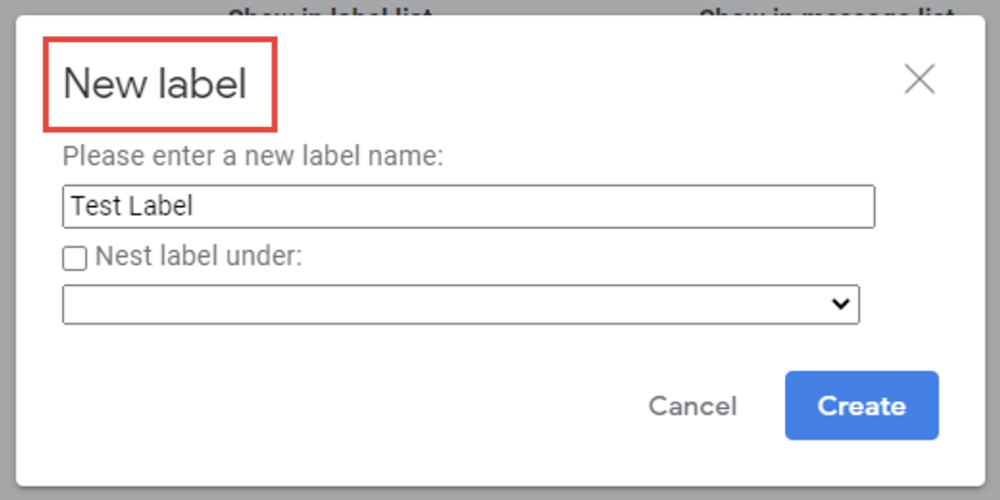
4. Name your new label; for emails from clients. use the label “Management.”
The popup window shown above appears when you click on “Create new label.” Name the label. You can also choose to nest it under a pre-existing label. Be careful when ticking this checkbox so that you do not lose track of the newly created label.
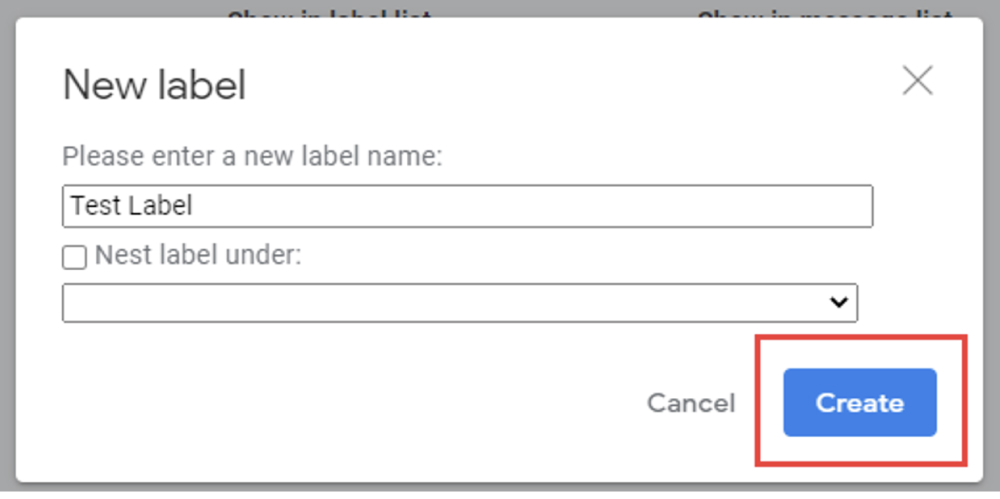
5. Click create
Once satisfied with the details filled, click on the “Create” button.
When creating labels, it is paramount that you use an easy-to-remember name for the labels. Typically, the name assigned is based on the types of emails included in the label. For instance, if you created a label for bank statements, you may consider naming it as “Bank Statements’ or something along these lines.
Organize labels in Gmail by color code
You can organize labels in Gmail by Color-code to make your labels visually stand out from one another. Gmail provides you access to a wide range of colors that you can use to create a visual distinction among your labels. Doing so helps you to avoid unnecessary confusion
Color-code your labels in Gmail
1. Find your label’s name on the left-hand side of your Gmail inbox
Scroll through the left-hand-side panel of your Gmail account until you find the created Gmail label.
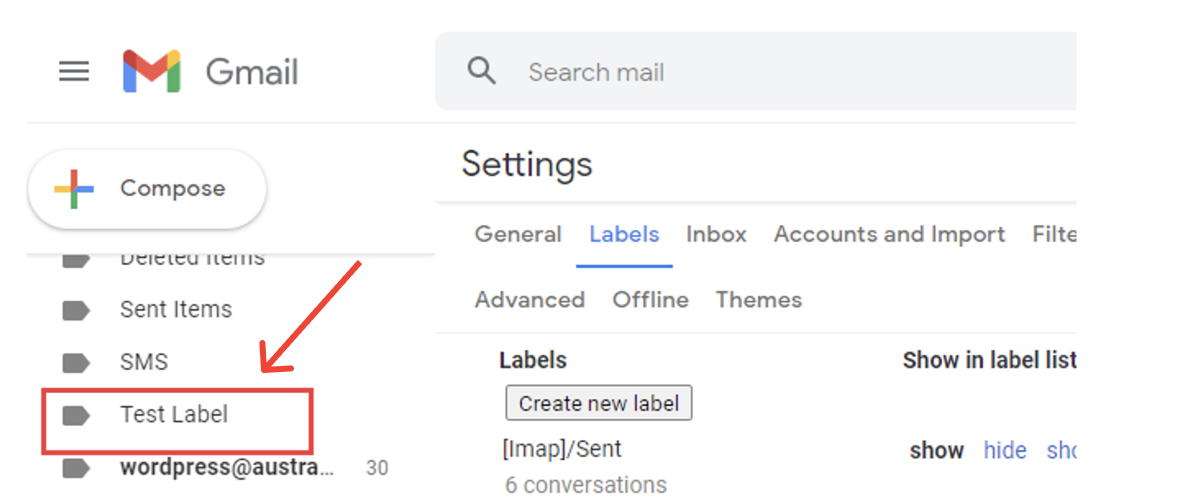
2. Click the 3 dots
Hover over it and click on the 3 dots display a number of options. Your focus is on the color section.
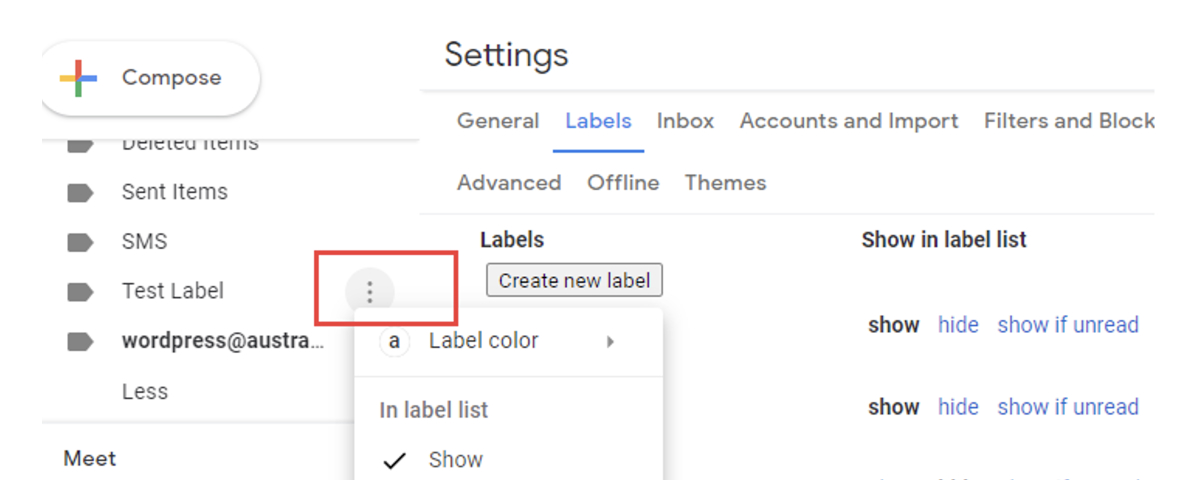
3. Select Label color
Hover your mouse over the “Label color” bit to showcase the various colors that you can use. You can even add a custom color if you do not find the desired color selection.
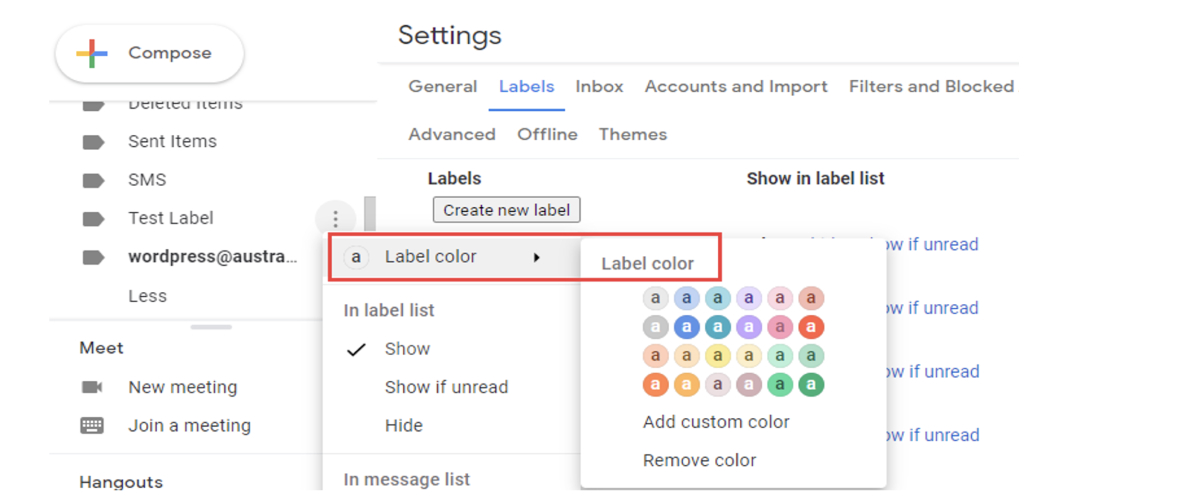
4. Pick your color
Select the color you’d like for the label; I picked red to make it super visible.
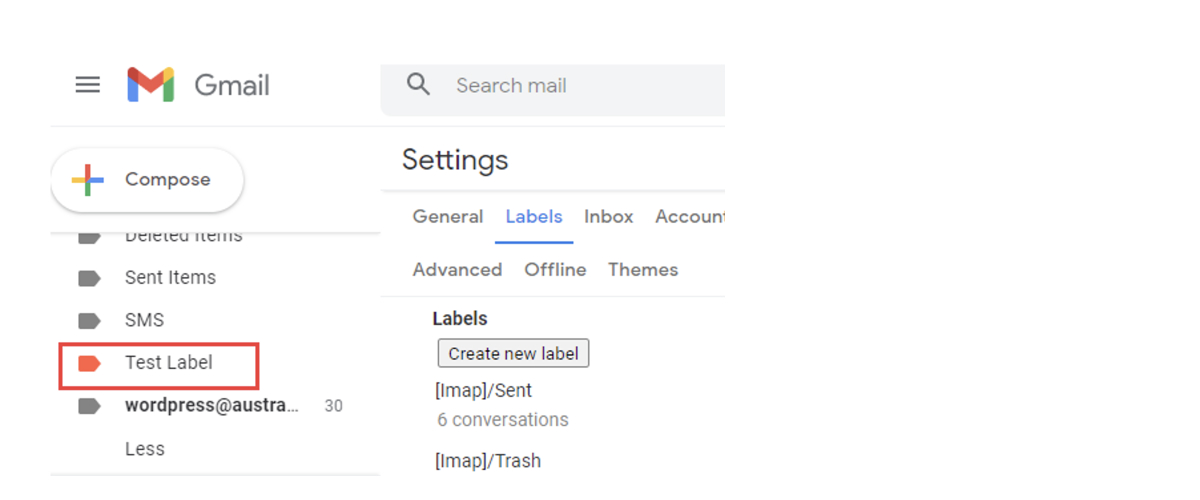
Recommendation: Whereas you have a variety of colors to choose from, make your decisions based on the essence of the label. For instance, red should be used for super important recipients. The green color denotes calm and relaxation.
Add filters & rules to sort labels
Setting up filters in Gmail is the same as setting rules, you can configure filters such that incoming emails apply to particular labels depending on the type of rule created. The process of setting up filters is similar to creating labels. After setting up filters, all new emails set to that filter will be automatically labeled to your emails in Gmail as they come. This section shows you an alternative way to do so.
How to add filters to sort labels in Gmail
Add filters to sort labels in Gmail, aka setting up a Gmail label rule, you can configure filters such that incoming emails apply to particular labels depending on the type of rule created. The process of setting up filters is similar to creating labels. After setting up filters, all new emails set to that filter will be automatically labeled to your emails in Gmail as they come. This section shows you an alternative way to do so.
1. Locate the gmail search box
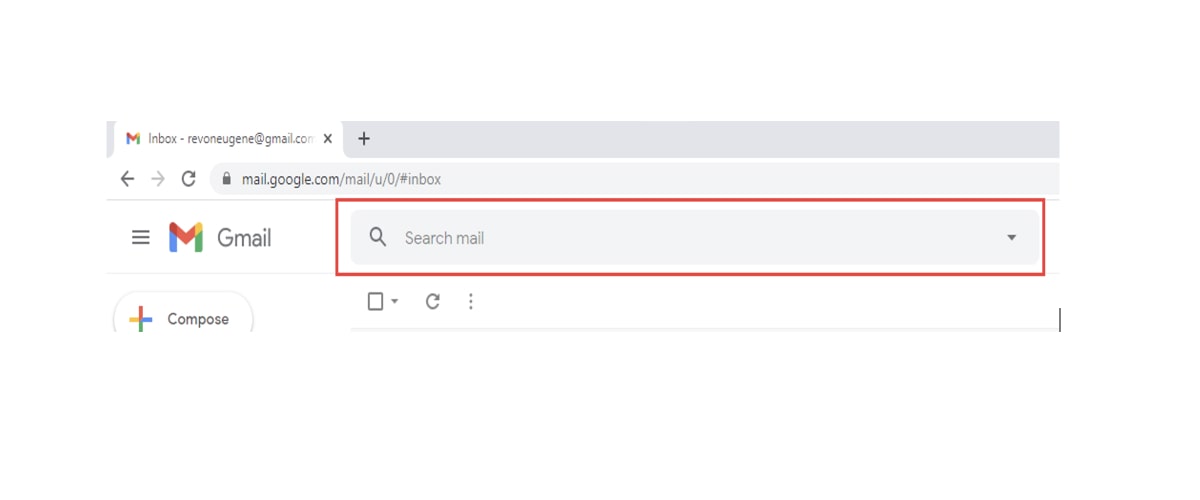
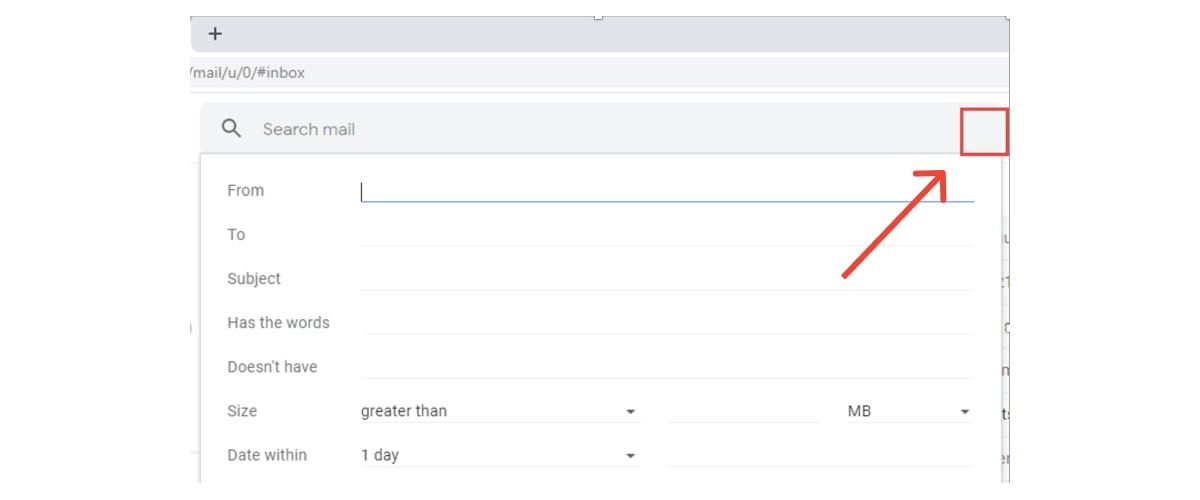
2. Click the down arrow, which opens a window to create a filter
The dropdown icon is located on the right far-end of the “Search mail” text box. Click on it to reveal the details shown in this screenshot.
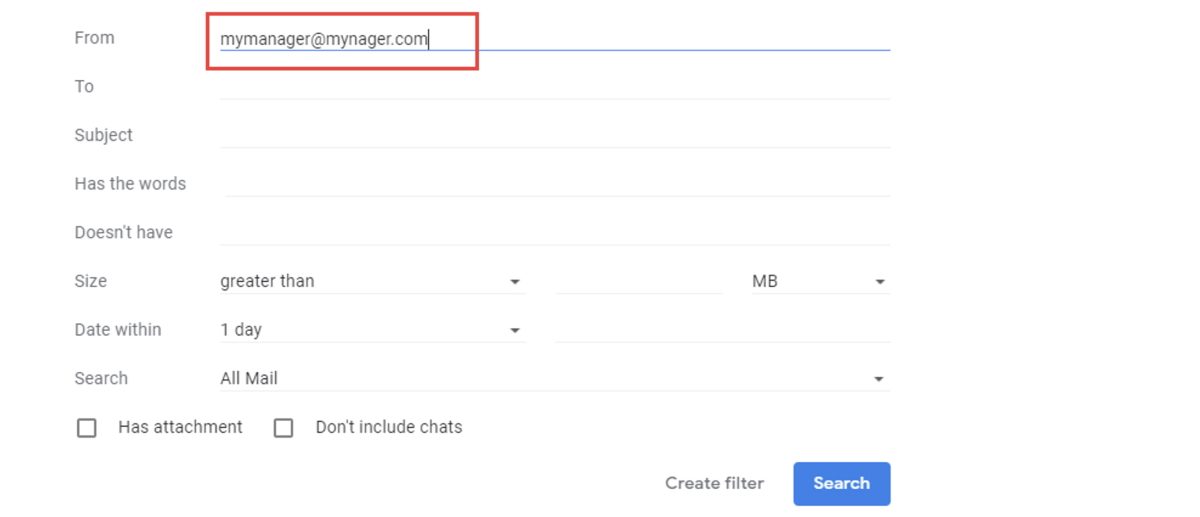
3. In the “From” section of the form, enter the email address of your manager.
Kindly remember that this is an example. You can use any other email that you would like to create a filter for in this “From” section. Another example could be bestcustomer@mycompanyname.com.
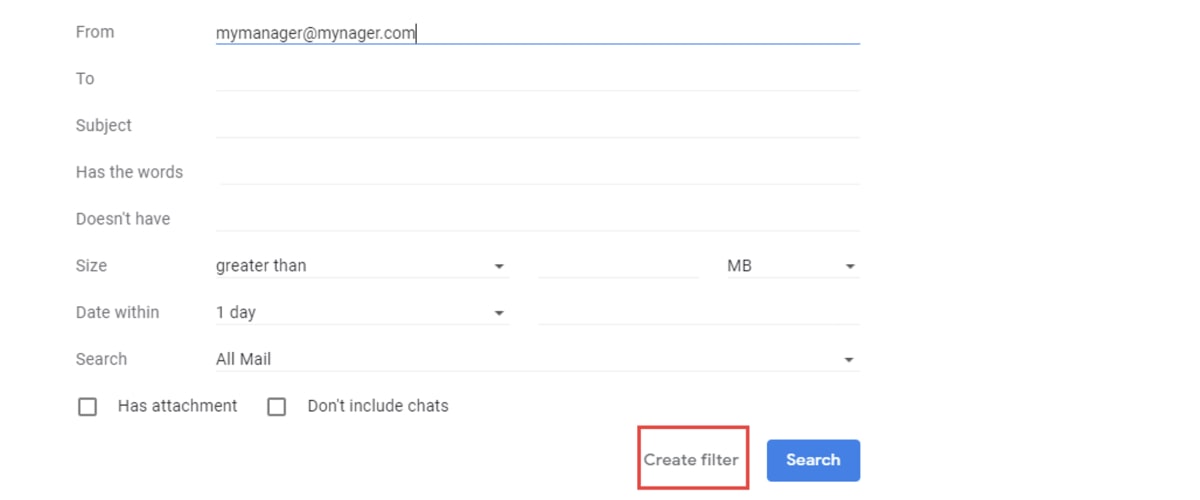
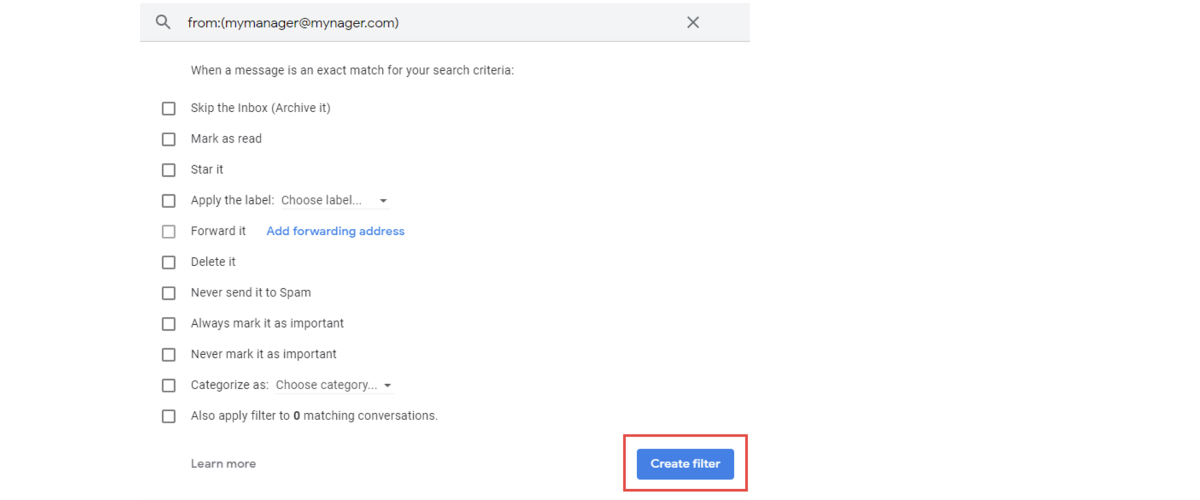
4. Select Create filter
Hit the “Create Filter” button. This takes you to the next page, where you need to make more definitions.
5. Update your filter as desired
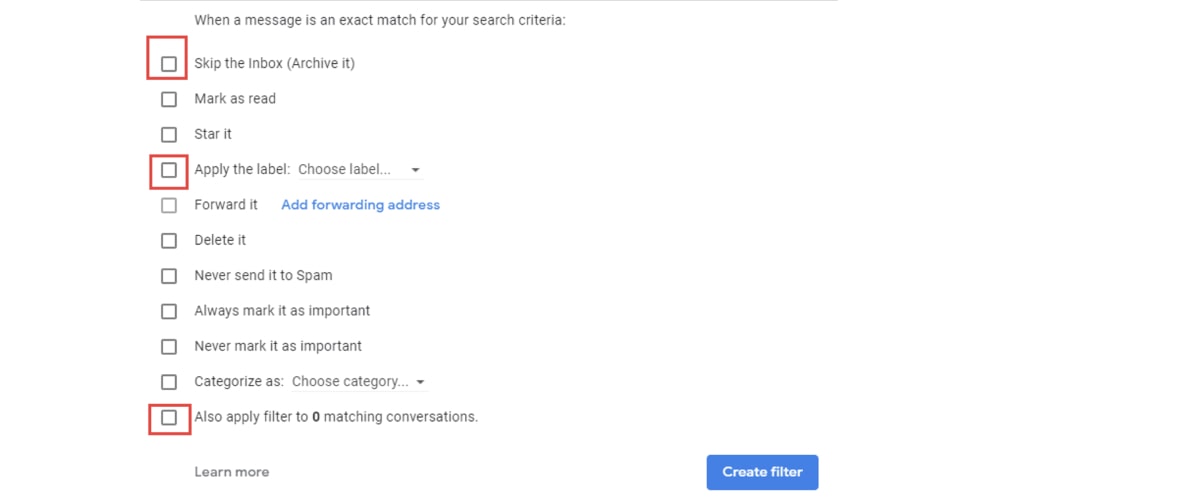
On the next page, after clicking on “Create Filter,” you have more options to choose from. You can choose to Skip the Inbox if you do not want that email to ever go to the Inbox. Click on the “Apply the label” dropdown option to either use an existing label or create a new label. Choosing “Also apply the filter to matching conversations” means existing emails will also go to the new label.
6. Select Create filter, and you’re done!
And that’s it! Check out the newly created filter plus label from the left panel. You can color it as shown above.
Manage & rearrange labels in Gmail
Having created your labels, it may reach a point when you need to manage them using various operations. The following sections will take you through the steps for deleting labels, adding labels to an email, nested labels, merging labels, and moving email to a label.
How do I delete labels for Gmail?
1. Locate the label from the left side panel
Scroll through the left-hand-side panel until you see the label that you would like to delete.
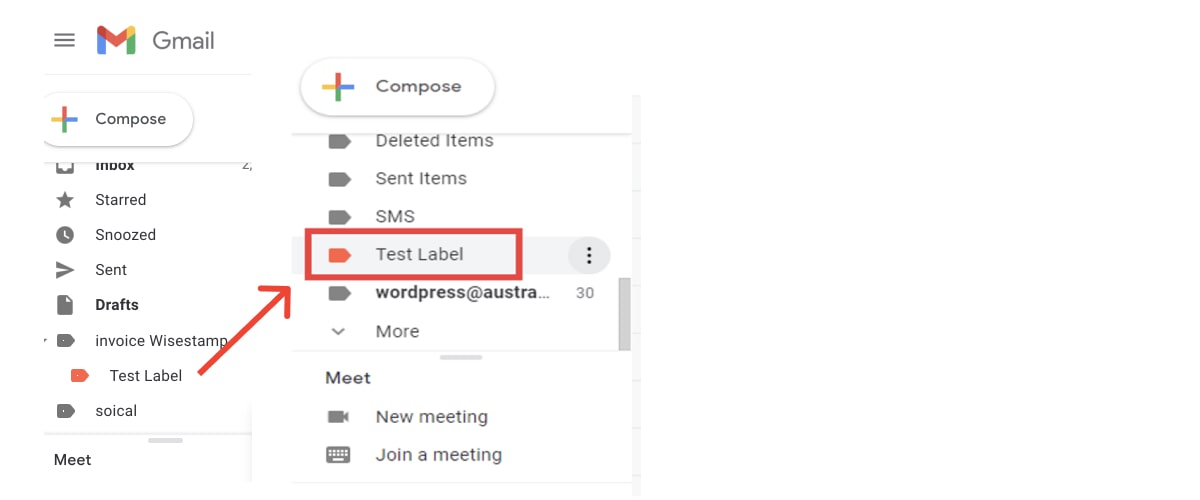
2. Click the three dots
Click on the three-dotted lines to reveal more options for this label
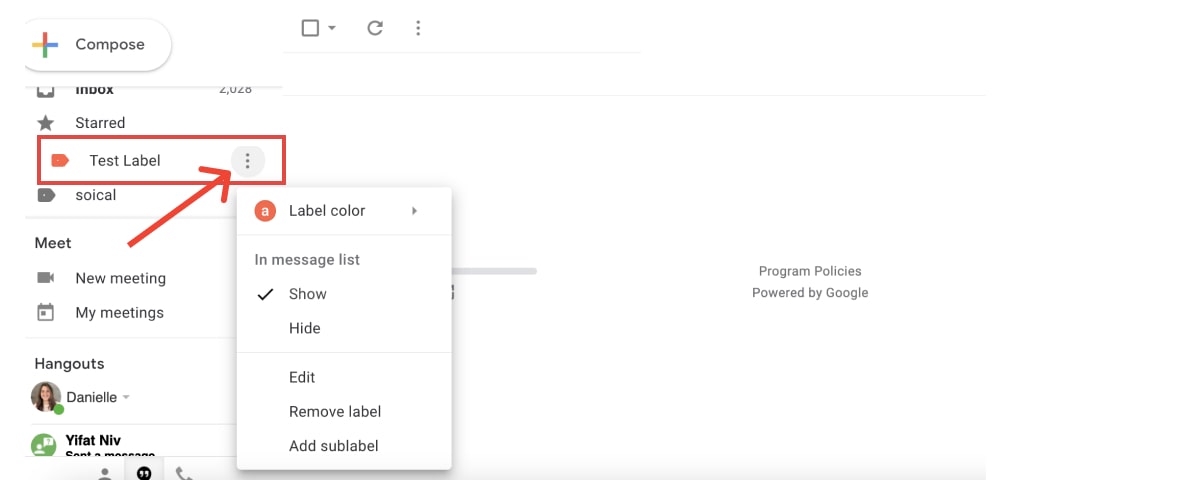
3. Choose “Remove label”
Select the “Remove label” option. And that’s it!
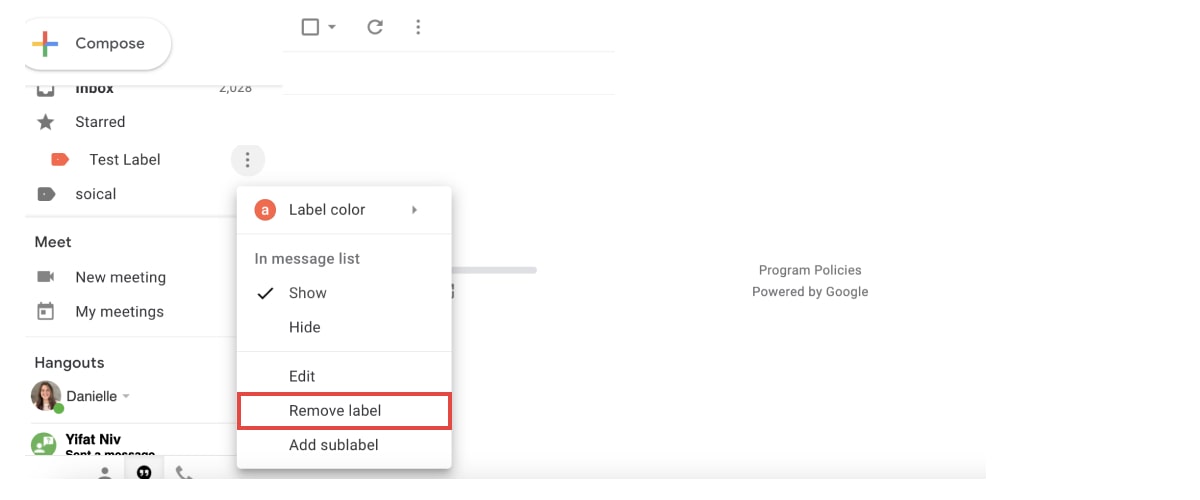
Please note that by removing the label, the emails in that label remain in the All Mail label. As you guessed it, even All Mail is a label.
How do I add a label to an email?
1. Right-click on the email and choose “Label as”
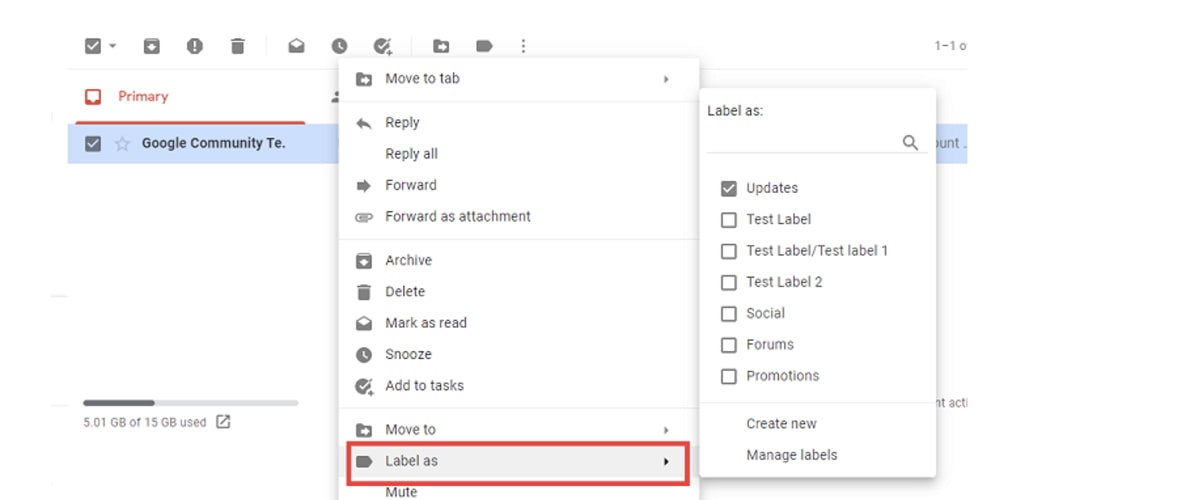
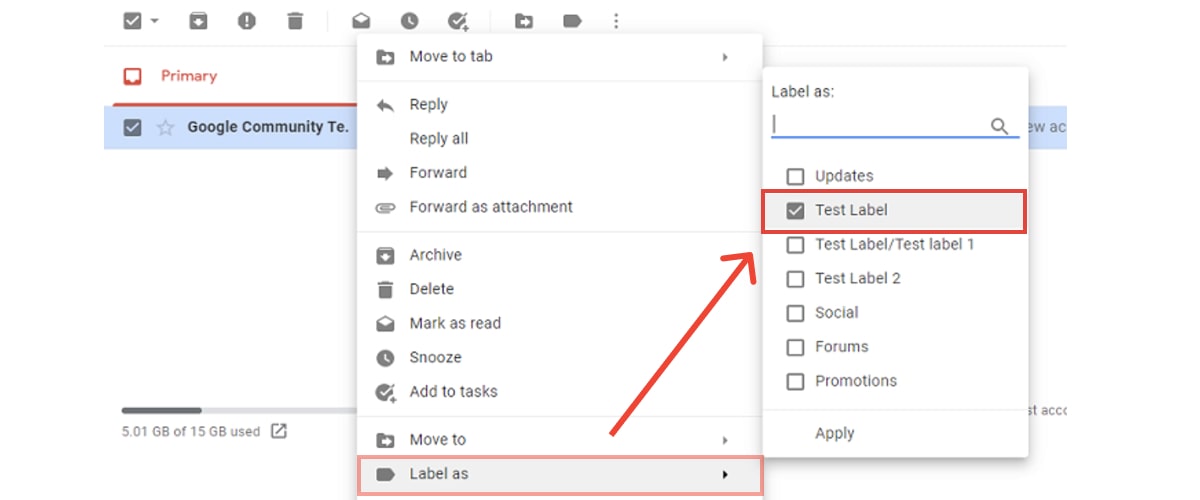
2. Select the desired label that you want to be applied to the email
3. Click on Apply
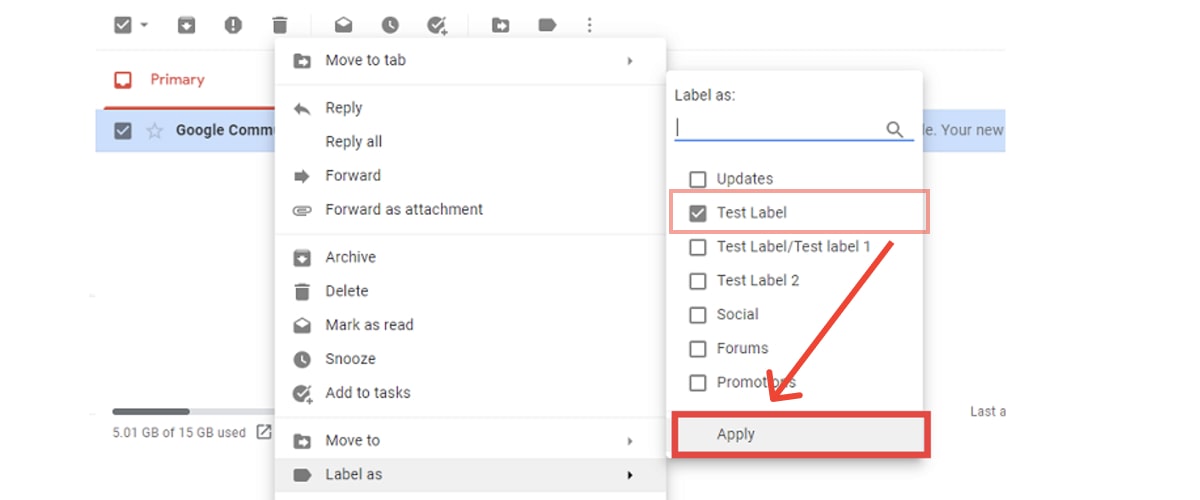
4. Review your label color
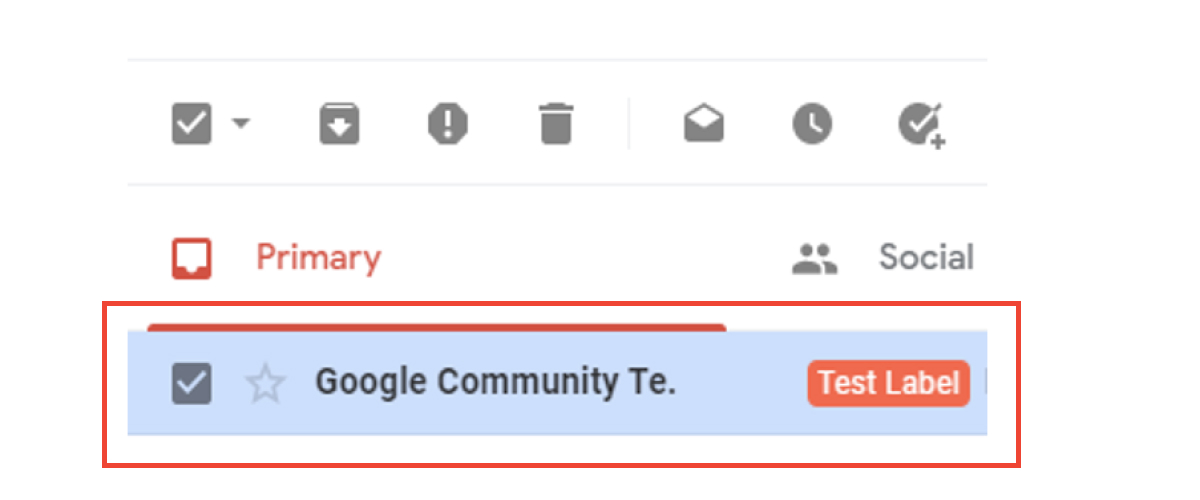
How to add a nested label?
Nested labels are like sub-folders, nested labels enable users to mark certain emails that fall under a large label. Labels can be continuously split up as each label ‘nests’ with the ones above it
1. Locate the label from the left side panel
Scroll through the left-hand-side panel until you see the label to which you would like to add a sub-label.
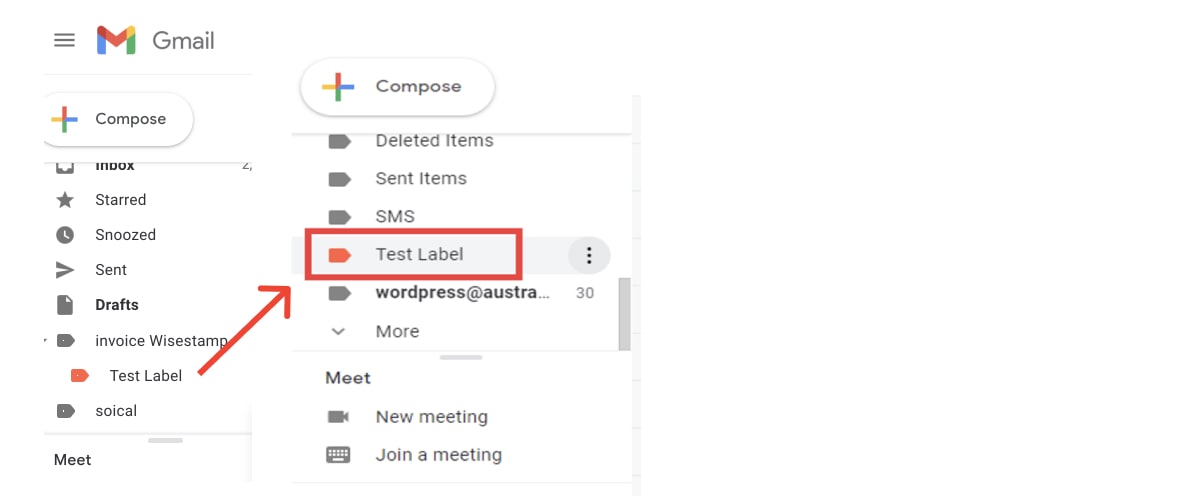
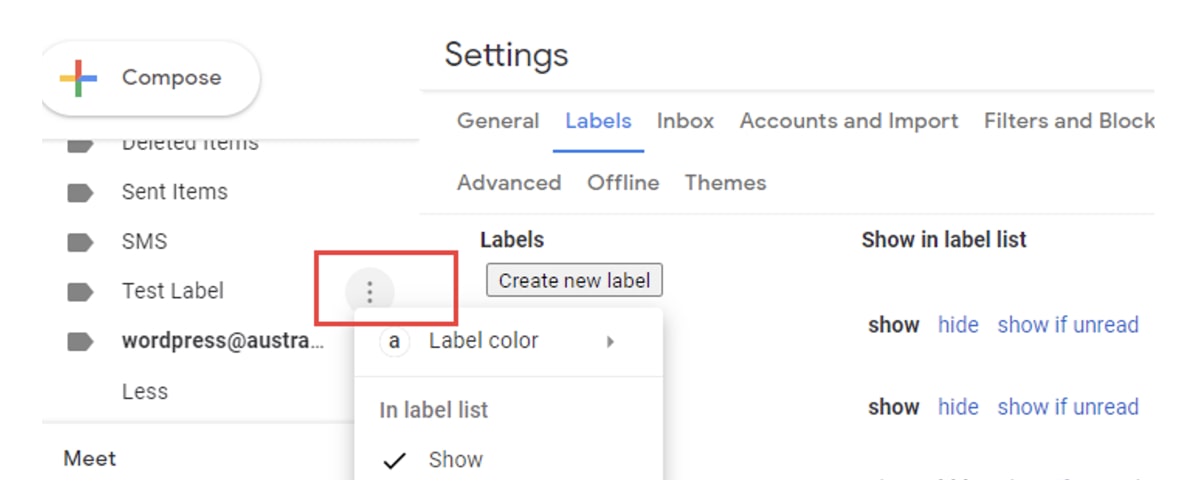
2. Click the 3 dots
When you hover over test label, 3 dots will appear. Click on the three-dotted lines to reveal more options for this label
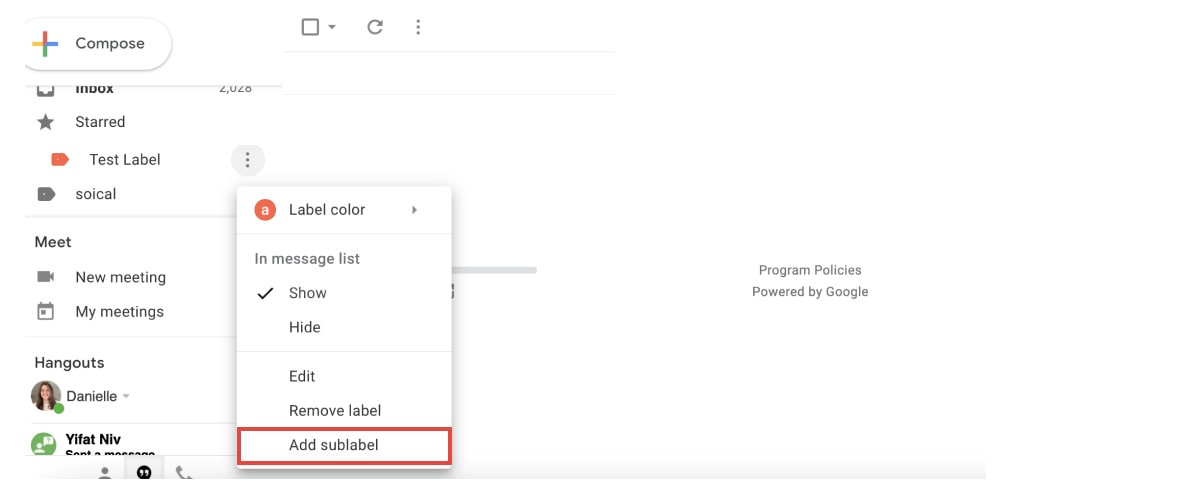
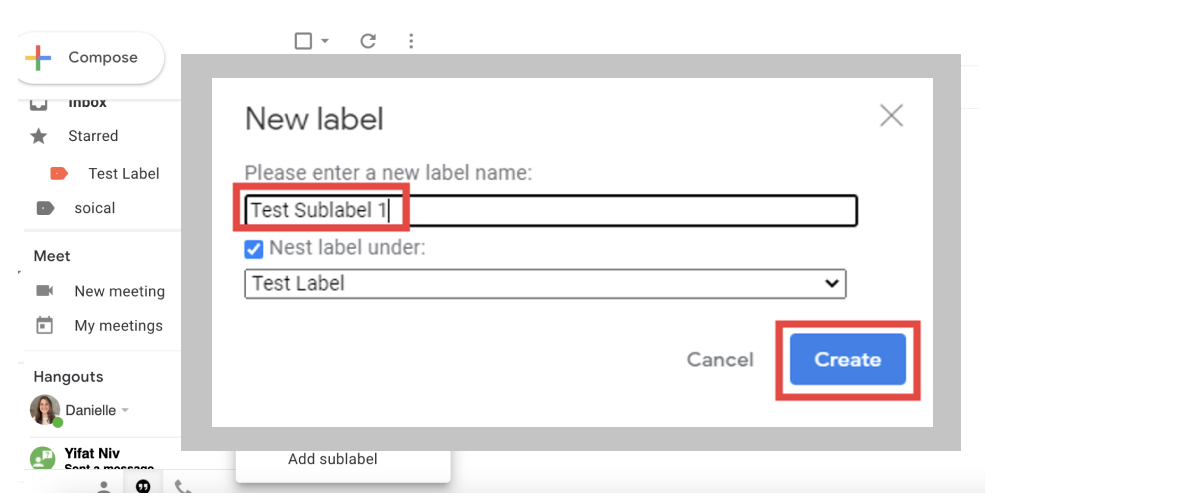
3. Choose “Add sublabel”
4. Enter sublabel details and choose “Create”
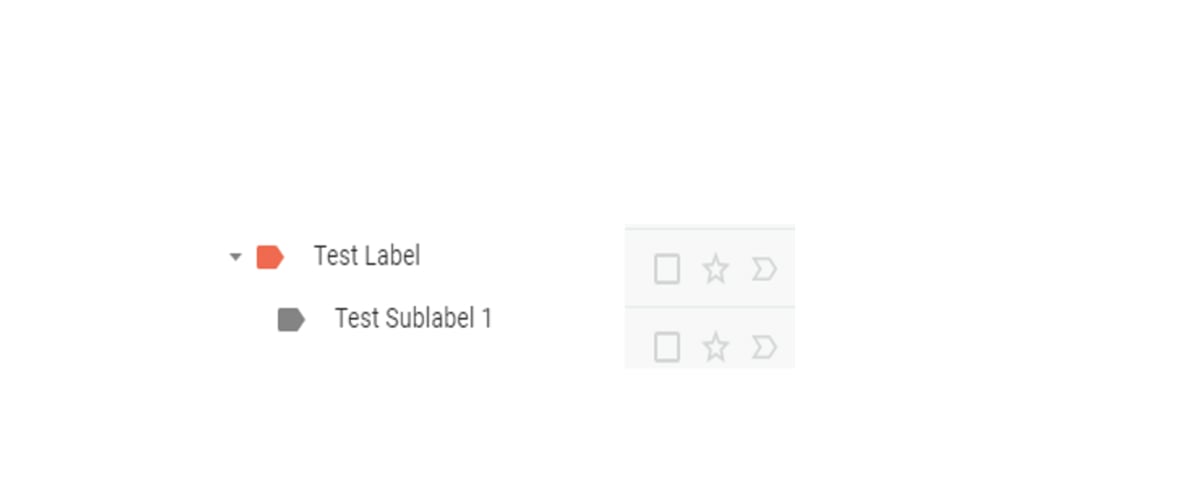
This forms on the left-hand-side panel of your Gmail account.
This forms on the left-hand-side panel of your Gmail account.
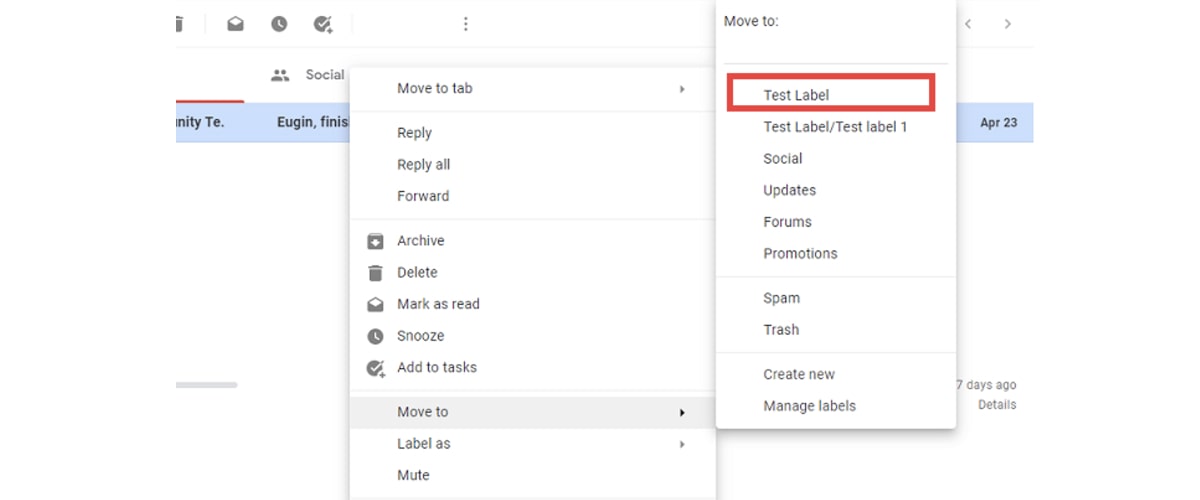
How to move an email to a label?
1. Right-click on the email
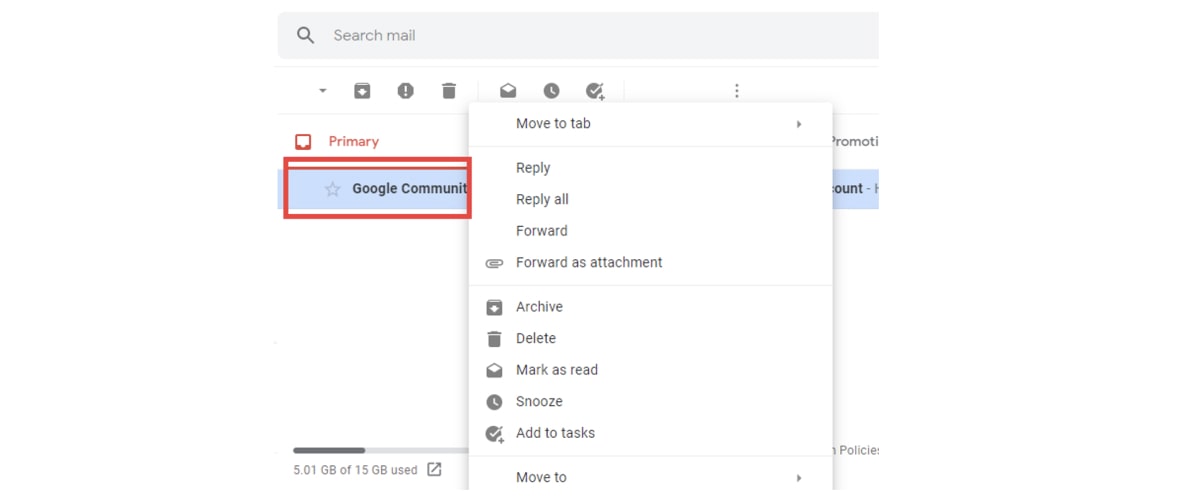
2. Choose “Move to”
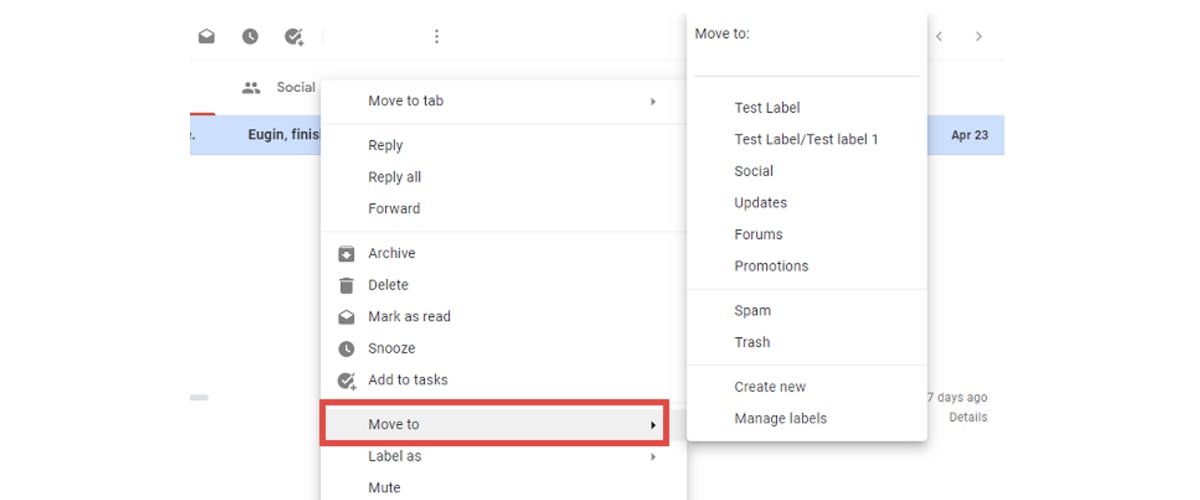
3. Select the target label
How to merge Gmail labels together?
1. Open one of the labels that will be merged with the other label
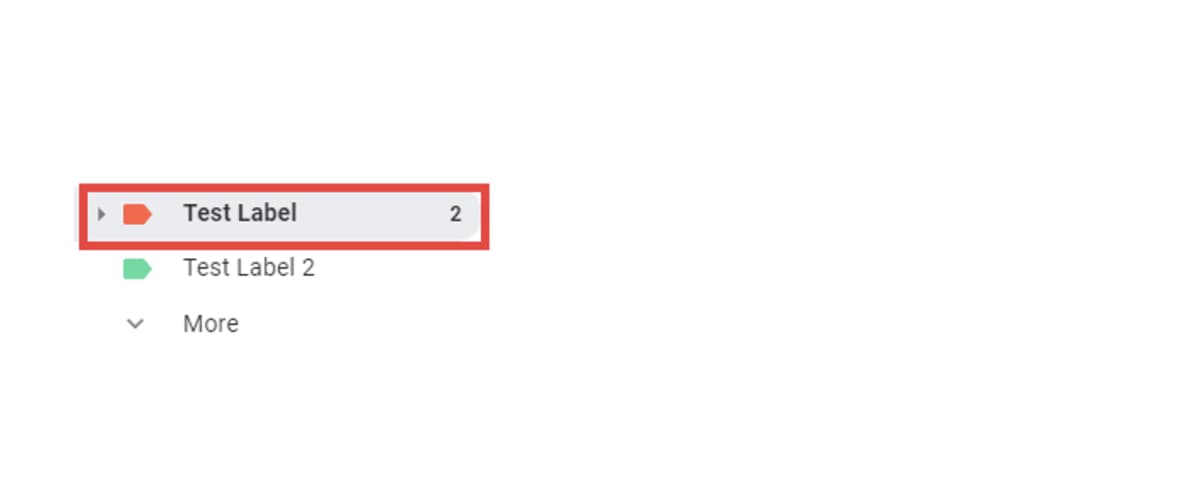
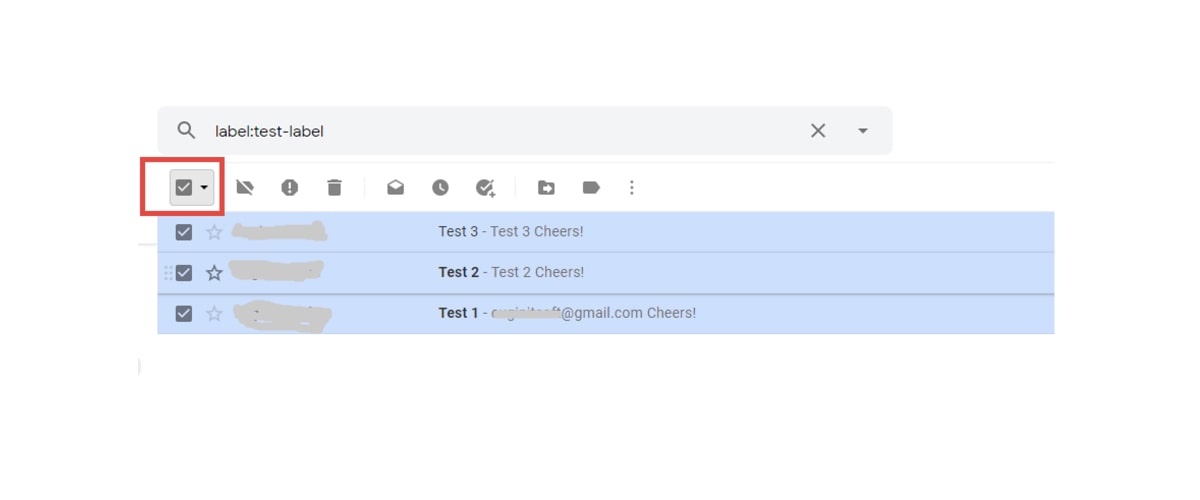
2. After all emails appear, select all emails by clicking on the top-left checkbox
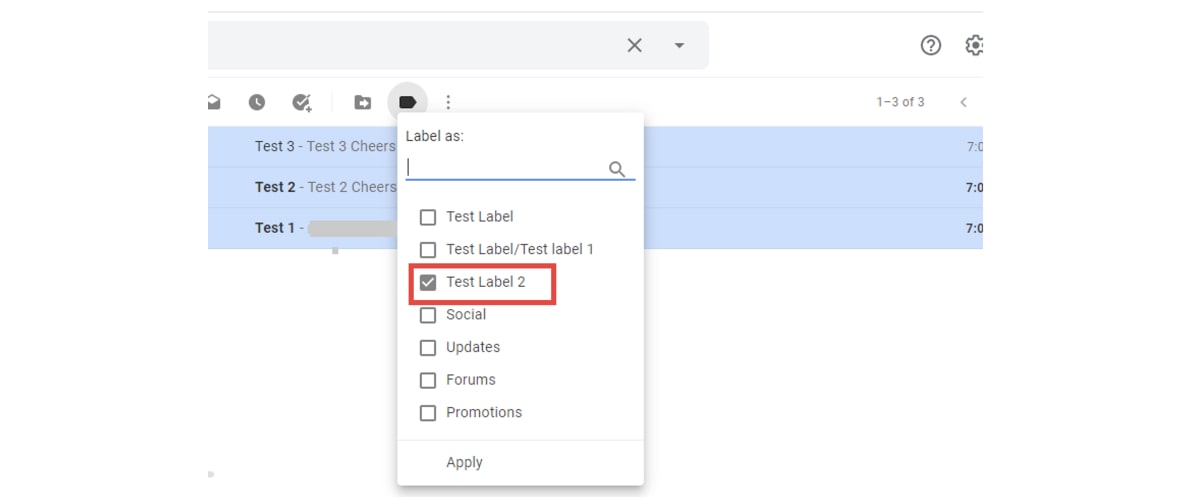
3. Click on the Label icon to reveal the “Label as” text box.
Uncheck the current label selection and choose the new label to which the current label will be merged.
4. Click on Apply
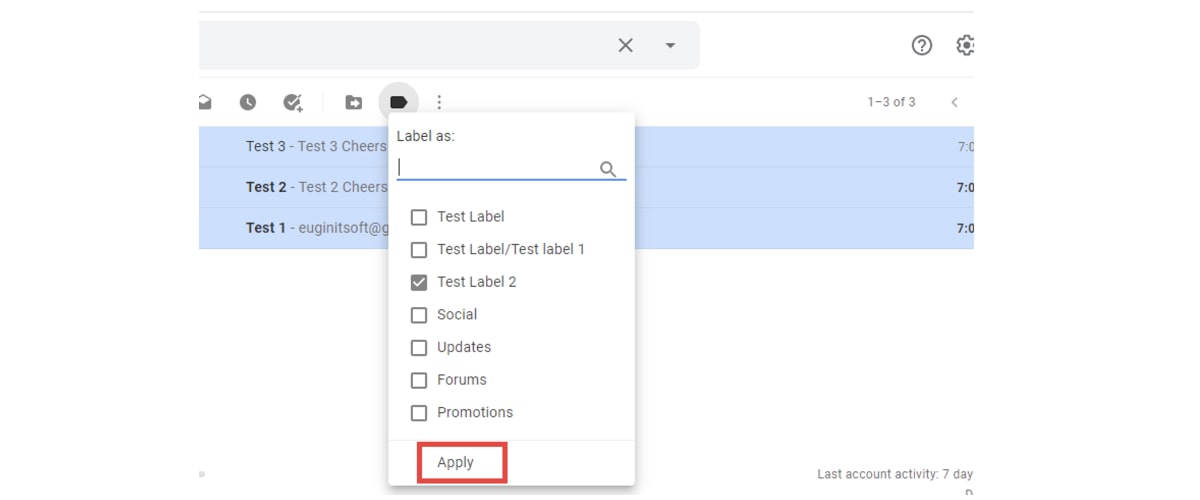
All the emails that you had selected will be moved to the other label, essentially merging them. You can comfortably delete the other label from which emails have been moved.
Having trouble setting up labels in Gmail? Solved.
Sometimes everything does not always go as expected. You may encounter several challenges as you try to create new labels.
Reasons why you may be having trouble creating new labels
- Outdated browser version: (solution: update your browser)
- Disabled critical extensions (solution: enable blocked add-on or extensions)
- Antivirus blocking your Gmail (solution: temporarily disable your anti-virus)
You can resolve these issues as guided below:
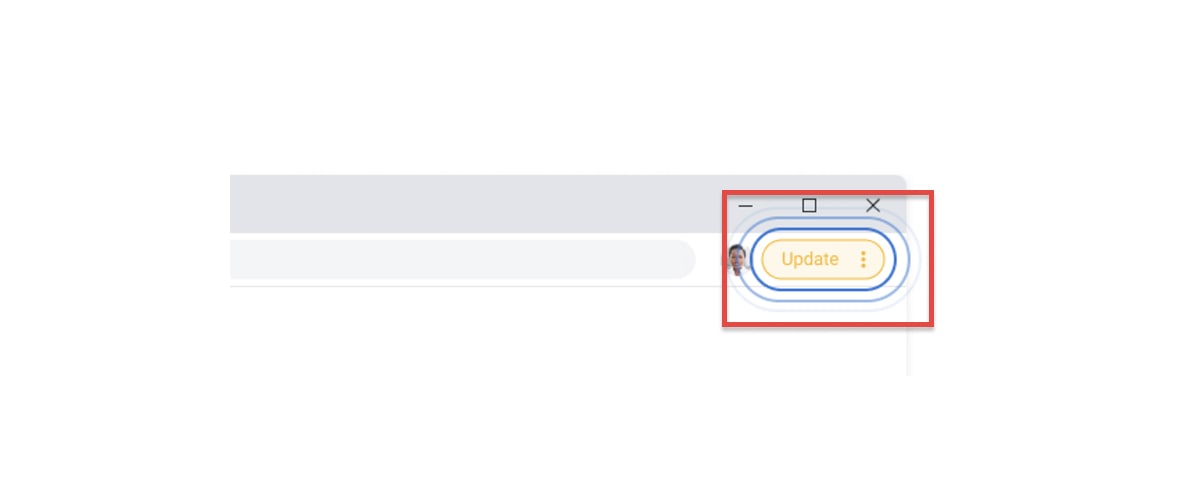
1. Outdated browser version: (solution: update your browser)
Given that Gmail is a Google service, you may find it necessary to access your emails and create new labels through a Chrome browser. However, that does not mean other browsers such as Firefox, Opera Mini, and Microsoft Edge would not work.
What you need is to make sure that you are running on the latest browser version. Chrome, and most browsers, updates normally happen in the background whenever you close and re-open the browser.
So, if you have not closed the browser in a while, you should do so. There could be a pending update. This would be as shown below:
2. Disabled critical extensions (solution: enable blocked extentions)
If you accidentally disabled important browser extensions, you may encounter challenges with creating new labels. Don’t worry because you can easily re-enable it in a few steps.
- Click on the three dots at the top right of your Chrome browser.
- Choose “More Tools” > “Extensions” > “Extensions”
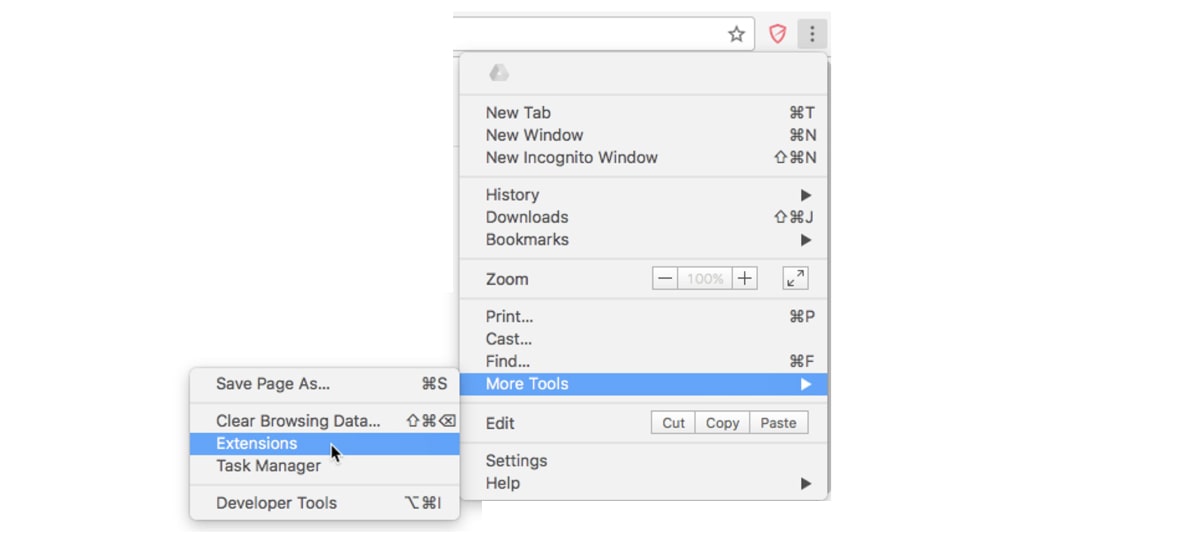
- Scroll through the list of extensions to check if there is a notable extension that’s disabled. Turn it on.
3. Antivirus blocking your Gmail (solution: temporarily disable your anti-virus)
The antivirus installed on your computer may cause you problems with creating new labels if it continuously blocks certain Internet activities. Identify the type of antivirus installed and visit its official website on how to temporarily disable scanning.
Gmail labels/filters aren’t working
Here are a few reasons why Gmail labels are not working and what you can do about it:
1) Labels are hidden
If you cannot find labels from the left panel, there is a chance that the labels have been accidentally hidden. You need to navigate to the settings page and check whether or not the specific labels you want are marked Show or Hide.
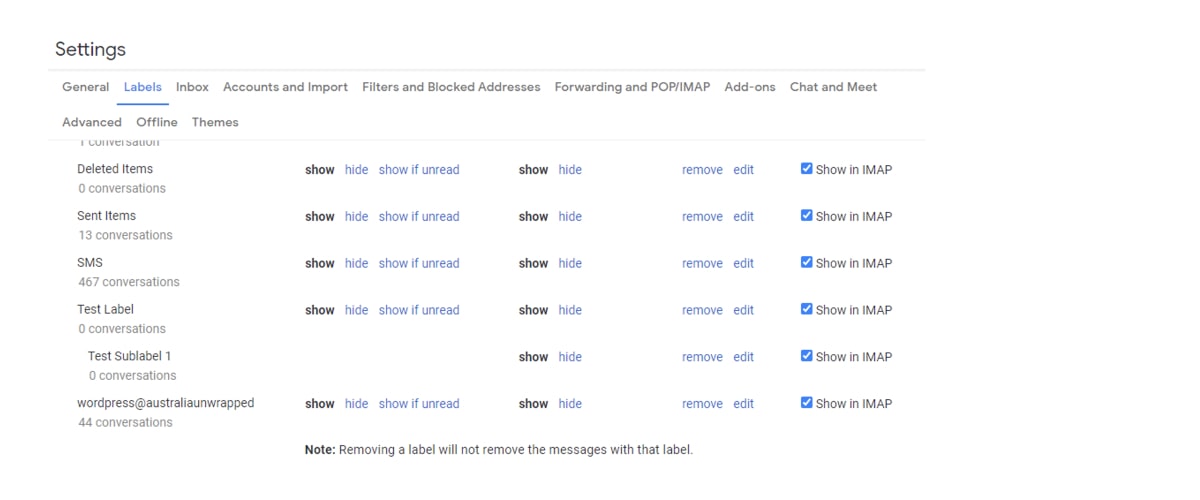
2) Your browser version is outdated
Sometimes you may be using an outdated browser version, hence the problems encountered with Gmail and its labels/filters. Browser updates often happen automatically in the background when closing and opening the browser.
However, that will not happen in case you have not closed your browser in a while. Fix the issue by closing the browser and allowing a couple of minutes before re-opening it. Now check if you are able to use Gmail without issues.
3) There is a problem with Google services
Whenever labels or filters are not working, it does not mean that the problem is always on your end. Sometimes Gmail may have run into problems, hence the challenges faced with the mentioned services.
You can perform a quick online search to check if there are any issues with Gmail. If so, there isn’t much that you can do apart from waiting on Google to get it resolved.
What’s next?
Creating labels and filters in Gmail provides you immense control as far as your Inbox is concerned. As explained in this guide, you will no longer struggle, wondering where certain emails have disappeared. Apart from creating the labels in a few steps shared, you can manage and rearrange them as desired.
There are multiple ways to organize your Gmail inbox and labels is just the first step, learn more about how to manage Gmail accounts or to set up and create a Gmail account for the organization. Since it’s pretty obvious, who doesn’t want to reach a zero inbox?
