How to Add an Email Signature in Exchange
Learn how to add an email signature in Microsoft Exchange in just a few minutes to automatically standardize company-wide signatures at scale

Short answer
How to add an email signature in Exchange?
-
- Access the Exchange admin center
- Choose Mail Flow > rules
- Add a new transport rule and specify it’s details
- Select “Apply the Disclaimer to the Message”
- Enter your Exchange Email Signature Template or Disclaimer and confirm the Signature cannot be added
- Test the Transport Rule and Save your configuration
- Enable the Transport Rule
How to create an email signature using Exchange transport rules?
Follow the instructions below and create a company-wide signature in Exchange 2019 (also work in Exchange 2016 and Exchange 2013).
In the Exchange admin center > Mail Flow menu select Rules
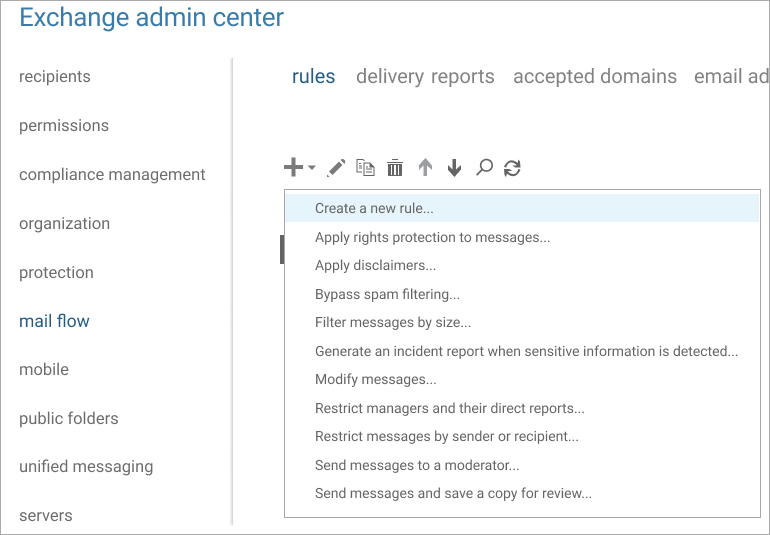
Login to your Exchange admin center using your Exchange credentials. In the admin options, click “Mail Flow” > “Rules” which will open a new set of options in a list.
Create a new Transport rule (Mail Flow rule)

Click the Add (+) icon and select “Apply disclaimers” from the drop-down menu.
This will create a new transport rule. Transport Rules, or Mail Flow Rules, are used to apply your Exchange signature to messages sent from your company.
Describe your transport rule in detail
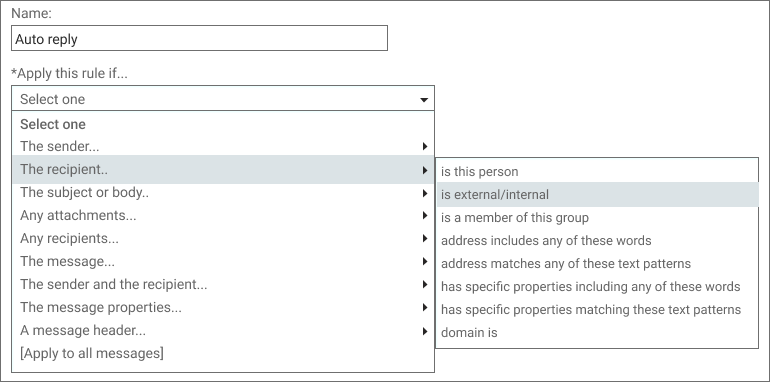
In the Transport rule lightbox, give the rule a unique name, such as the department to which it should be assigned or the email signature campaign.
Then, under *Apply this rule if… drop-down menu, choose how and when to add the signature to your users’ messages.
For example, you can assign the email signature to a specific employee, group of employees, or specific recipient properties.
Select "Apply the disclaimer to the message"

The option “Apply a disclaimer to the message” should already be selected.
But it’s always advised to confirm it by opening the drop-down menu under *Do the following > “Apply the disclaimer to the message” and then choosing “Append a disclaimer”.
Enter your Exchange email signature template or disclaimer
Click “Enter text” to copy and paste your Exchange email signature template and/or disclaimer. You can use either HTML or plain text format.
Please note that if your email signature design includes images, you will have to host them on an external server and add the relevant URLs in the HTML code.
A signature in Microsoft Exchange cannot include embedded images because there is no HTML editor built in.
Active Directory Attributes – If you want to embed each user’s contact information in the signature, you should use Active Directory (AD) attributes in your Exchange email signature template.
You can add an attribute to a signature by placing two percentage symbols on either side, i.e. %%LastName%%.
Choose what happens if the signature cannot be added
Next you’ll need to specify what should happen in case the signature cannot be added to an email message.
Click the “Select one…” button to see the three options:
- Wrap – in this case, the signature will be appended to a new email and the original message will be attached to it.
- Ignore – the email will be sent without the email signature/disclaimer (recommended).
- Reject – the email will not be sent, and a non-delivery report message will be sent instead.
Test the transport rule
Now is the time to click “Save” and verify that the Transport Rule works.
You can also select “More options…” which opens other rules you can apply to your signature, such as exceptions to your rules, and not applying your signature to certain group members.
Enabling / Disabling the Transport rule – You can enable/disable the transport rule at any time using the on/off checkbox. To make changes in your configuration, highlight the rule and click on the pen icon, right next to the Add (+) one option.
Save your configuration
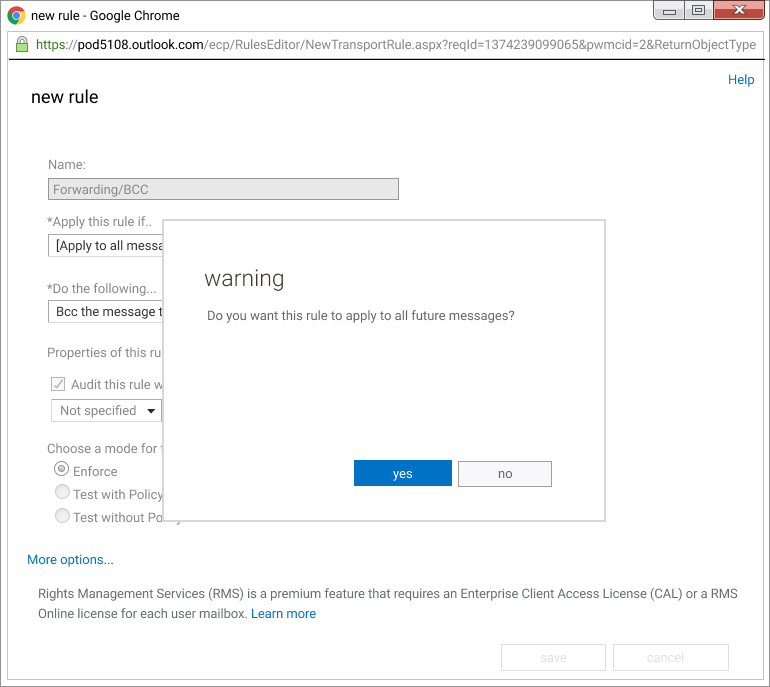
Before you save, make sure that under “Choose a mode for this rule” > “Enforce” is selected. Once you’re done, click Save to confirm.
If you want to log your transport rule’s actions without interfering with your email content, a number of test options are available as well.
Microsoft Exchange signature capabilities
Managing email signatures in the Microsoft Exchange server has come a long way since the days of using Visual Basic Script (VBS) in earlier 2000 and 2003 versions.
With the introduction of Hub Transport Rules in Exchange 2007, companies could apply a disclaimer to outgoing messages without the need for VBS expertise.
Exchange 2010 made email signature management slightly easier by offering customizable elements such as Active Directory (AD) Attributes, and the ability to create HTML email signatures with inline CSS.
Exchange 2013, 2016, and 2019 took email signature management to the next level by adding more conditions and actions for creating transport rules.
However, the actual creation of an Exchange signature remained largely the same.
The only significant difference was that the disclaimer text window was now triggered via the Exchange admin center.
Here is a list of things you can and cannot do with Exchange email signatures:
4 things you can do with exchange email signatures
- You can pull contact details from Active directory: If you’re using Exchange 2010 or above, you have the capability to easily pull contact information from Active Directory to populate Exchange signature templates. By using Active Directory, you can easily retrieve contact information such as email addresses, phone numbers, and job titles for your employees. With this info, you can easily populate your signature templates with the relevant details.
- You can create an HTML email signature: In Exchange 2010, you have the HTML support to customize your signature with dynamic elements. With this feature, you can add custom fonts using inline CSS, change font sizes, and use signature colors with hex codes. Additionally, you can insert hyperlinks to make your signature more interactive.
- You can set limited time-based rules and defer the message if the rule doesn’t complete: With Exchange signature rules, you can set time-based limitations for your email signature. For instance, you can set the signature to apply to outgoing emails within a specific time frame, such as March 1st to March 31st. However, you cannot set a recurring rule due to the year being part of the date. In case of rule processing errors, the rule editor allows you to choose whether to defer the email message.
- you can customize your email signature to match the sender based on message header, envelope, or both: This feature provides flexibility to meet your unique needs. Furthermore, you can add additional comments to give more details about your signature.
4 things you can’t do with exchange email signatures
- You can’t use a pro email signature editing platform: Although the Exchange Management Console provides an interface for creating a disclaimer rule, it does not offer an email signature editor. Instead, you must choose from pre-defined options to create your signature. Once you’ve made your selection, it’s important to test your signature with a live email send to ensure it’s working as intended.
- You can’t embed logos and images directly into the Exchange signature template: This isn’t a viable option as it’s likely to result in a blank square with a red “X” or an attachment to the email message. This can increase the email size and get stripped out by certain email clients. Instead, you’ll need to host the images online and include them in the email signature as a link. However, keep in mind that the images won’t be automatically displayed.
- You can’t place signatures directly under the latest reply or forward: As a result, outgoing messages with signatures will be placed at the bottom of the email chain. This can lead to signature content stacking up as more emails are sent, making the conversation unreadable and difficult to follow.
- You can’t hide contact fields: In Exchange signature, empty contact fields cannot be hidden even if they are blank. While AD attributes can be included, they cannot be set to be hidden if certain contact fields are empty. For instance, if some users have a mobile number displayed but others do not, the field will still appear in the Exchange signature, although it will be empty for users who do not have a mobile number.
To work around all these “Can’t do’s”, Microsoft recommends choosing a third-party email signature manager software platform to meet your company’s unique needs.