How to start a blog: 11 actionable steps anyone can do
Learn how to start a blog for your business in just a few simple, actionable, and impactful steps that you can do on your own within a few hours.

Blogging can be a powerful tool for your business. According to research, businesses with a blog get 55 % more website visitors and 97% more links, than those without a blog.
And marketers who use blogs receive 67% more leads than those that don’t.
Benefits of starting a blog
In case you’re still not convinced that your business needs a blog, here are just a few of the benefits blogging will bring to you and your company.
1. Blogging will help you establish yourself as an industry leader
Having a blog gives you a platform for sharing your knowledge and offering advice on topics related to your industry.
People who are interested in these topics will visit your blog, read your articles, and begin to view you as an expert in your field. When your blog readers need the service that your business provides, they will turn to you since you have proven that you are the best person to provide that service.
An example of someone that does this well is Mark Schaefer, a globally-recognized author, educator, and business consultant. Mark has an active blog that has been responsible for many of his book sales and for his growing reputation as an expert marketing strategist.
2. A blog will draw more visitors to your website
The more visitors that come to your website the more opportunities you have to sell your product or service. Writing high-quality articles that get found in Google search results will bring people to your blog who are interested in what you have to offer.
3. A blog will amplify your message
The fantastic blog posts that you write will not only serve as examples of your expertise but will also give people a reason to talk about your brand. Through your articles, you can generate conversations and encourage the sharing of ideas that are in line with your brand’s message.
4. A blog will help you connect with your customers
Your business’s blog will become your voice for connecting with your customers and strengthening your relationship with them. You’ll write blog posts that your visitors may comment on, leading to interesting conversations. You can also use your blog to share videos, photos, and exclusive information, available only to your readers.
How to start a blog
Starting a new blog can seem a bit intimidating if you’ve never done it before. It’s true that there are several steps involved in getting a blog set up, but it’s really a lot easier than you might think.
In fact, I’m going to show you how to do it right now! By the time you finish reading this article, you’re going to know how to set up your own blog, optimize your articles for SEO, decide what to write about, and set up Google Analytics to track your results.
So let’s get started!
Step 1: Choose the right platform for your blog
Before you start creating amazing content you need to have a platform to publish that content on. Therefore, the first decision you’re going to want to make is which blogging platform to use for publishing your blog posts.
There are many options out there but here are three of the most popular: WordPress.org: This is the most widely used blogging platform, powering 26.4% of all the websites online.
Each day over 500 sites are being created on WordPress.
WordPress is free, easy to use, and offers a lot of flexibility, which is why it’s so popular, and why I so frequently recommend it.
If you already have a website then you can add WordPress as a page or subdomain of your site. Otherwise, you will need to find a service to host it, like Hostgator or Bluehost, which offer services specifically for hosted WordPress sites.
Cons: WordPress is a good choice for people who like to be involved in all aspects of their website. There is a bit of a learning curve in getting it set up, and it requires occasional maintenance and updates. If that doesn’t appeal to you, you may want to go with another option. Or you can hire someone to manage your blog for you.
If you want to go the super-easy route then WordPress has another tool that may be a good fit for you, WordPress.com, a free blogging platform hosted by WordPress.
Blogger: I actually started my first blog with Blogger and was very happy with it. It was easy to set up but offered enough options for customization that I was able to make my blog look just the way I wanted it to (though it required learning some HTML). Blogger is also hosted by Google and has built-in tools for Adsense, Adwords, and Google Analytics, making it easy to monetize your blog and track visitors.
If you don’t want your blog to be under the blogger.com domain you can purchase a custom domain through Google or add the blog to your website. You can find more information about how to do this on the Blogger Help site.
Cons: Since Blogger belongs to Google, your blog and all of your content technically belong to them as well. They can shut the service down or block access to your blog and there’s nothing you can do about it (not that this is a common occurrence, just something to be aware of). And while it offers more flexibility compared to WordPress.com, if, at some point down the road, you want more advanced blogging features, you may be disappointed.
Wix: With Wix, you can quickly create for yourself a blog or website in a just a few minutes. Simply pick a template, put in your information and you’re done. There is a large selection of templates to choose from and the website builder is very user-friendly.
Cons: While a basic Wix website or blog is free it does come with quite a few limitations. Your site will have ads on it, you’ll have a wix.com domain and you’ll be limited to 1GB of traffic and 500MB server space. You also won’t be able to add Google Analytics.
To remove the ads, use your own domain, add analytics, or make use of the numerous plugins available in the Wix App Store, you’ll have to upgrade to a paid account.
Paid accounts range from $3 a month to $39.99 a month.
WordPress: If you want a free blogging platform that will be suitable for your business as it grows and comes with a lot of options for customization then WordPress is the one for you.
Blogger: If you have a small business and want a free blog that’s easy to set up and offers monetization options, then Blogger could be a good fit.
Wix:If you’re looking for the fastest and easiest option for setting up your blog, and don’t mind spending a little bit of money, then Wix would be a good choice for you.
Step 2: Choose your blog template
Once you’ve picked your blogging platform and signed up, it’s time to choose a template and customize it to meet your needs.
Your blog template provides all of the styling elements for your blog, including the colors, the fonts, the page layout, and any other additional design details.
This template has a specific layout that includes two columns, one in the middle and one on the right, along with a navigation bar on top and a few featured posts on the front page.
Many templates offer you the option to customize some parts of the design like maybe changing the colors or picking a different font. You’ll also most likely be able to change the picture at the top of the page.
At first, picking a template might seem a bit overwhelming because there are so many options to choose from. But keep in mind that you’re going to want a template that matches your website and brand, which should help narrow down your choices.
Common types of blog template layout
You’ll want to decide how many columns your blog should have, one, two, or three, and that should narrow down your options even further. Let’s see what this all means.
One-column layout
If your blog has one column that means that all of your content will be in the center and you won’t have any sidebars. This keeps the blog clean and distraction-free.
This could be a good option for a blog in which the articles are the only attraction, but might not meet your needs if you want to have a navigation bar or ads on the sides.
Canva’s blog is an example of a one-column layout.
Their content is all in the middle and at the top are the same navigation bars that are present in the rest of the website.
There is also a social sharing bar on the left side. Which follows you as you scroll down the page, but which isn’t part of the template.
The Help Scout blog also has a template with one column and a social sharing button on the side.
Two-column layout
A blog with a two-column layout will include the main column of content along with a sidebar, which can be on either the left or right side of the page.
This is the most common format used by bloggers since the sidebar offers the space to include navigation links, a search button, subscription links, and an RSS feed. For your business blog, you will want to include your most important elements at the top.
If your goal is to get visitors to sign up for your email list then your email list opt-in box should be at the top.
At WiseStamp blog, we use a two-column layout for our blog. Our blog posts are located in the middle column and in the sidebar we have a search button, social sharing buttons, a call to action and a navigation bar.
Three-column layout
The three-column layouts are for businesses and websites that have a lot of information to display.in the sidebars, probably mostly advertisements. This layout has the risk of distracting visitors from the blog’s main content, though it may also give you more opportunities to promote yourself or your affiliates.
Mashable’s template is a three-column layout, with each column presenting different articles on the website.
So how many columns should your blog include?
- One-column: If the sole purpose of your blog is to encourage visitors to read your articles then a one-column template should do the trick. This will keep your blog distraction-free and your visitors focused on your content.
- Two-columns: If you want to include more elements on your blog than just blog posts and a basic navigation bar, then you may want to go with a two-column template. This will allow you to add a sidebar with archives, polls, a logo, a newsletter sign-up, and many other elements that wouldn’t fit into a one-column template.
- Three-columns: If you have a lot of information that you want to share with your blog visitors, such as various navigation options and categories, as well as advertisements, then you might need a three-column template to fit it all in. Three columns are most frequently used for large websites with many pages or online magazines.
Once you’ve chosen your preferred layout you can begin browsing through the templates to pick one that you like.
Step 3: Choose your website colors
When deciding on the colors that you want for your blog, try to choose colors that match your website or logo, to keep your blog inline with your brand.
Step 4: Make sure your blog is mobile-friendly
Statistics suggest that in 2017 more than 63.4 percent of mobile phone users will access the Internet through their devices. This means that most people visiting your website will be using their phone or tablet, so you need to make sure that your blog looks good no matter what device it’s being viewed on.
Once you create your blog you can use quickly check if it’s mobile-friendly by putting the URL into Google’s Mobile-Friendly Test site.
Another helpful tool is Google’s PageSpeed Insights which will analyze the speed of your site and the user experience, offering suggestions for improvement.
To ensure that your blog is mobile-friendly Google recommends using a responsive design for your template, in which the layout will look the same no matter what device is being used to view your content.
WordPress has a nice selection of responsive themes on its website, as does Wix, and a quick search for “responsive Blogger templates” will also turn up some great options.
Make your website mobile-friendly with plugins
You can also make your WordPress theme mobile-friendly with a plugin like WPtouch Mobile.
Plugins are pieces of software that can be added to your blog to give it more functionality.
For example, if you want to have more options for editing pictures in your WordPress blog posts, simply download the Edik plugin and you’ll soon be able to flip your pictures around and even add filters.
One of the biggest advantages of creating a blog with WordPress or Wix is that there are hundreds of plugins available to enhance your site.
Most popular WordPress plugins:
- Yoast SEO: Improves your site’s SEO.
- Akismet: Blocks spam in your comments.
- WP Smush – Image Optimization: Reduce image file sizes, improve performance and boost your SEO.
- Contact Form 7: create customized contact forms.
- Wordfence Security: Protects your blog from hacks and malware.
Step 5: Add social sharing buttons and subscription options
After your blog is set up you’re going to start writing articles that are so fantastic that everyone who visits your blog is going to want to share them with their friends. So you have to make it as easy as possible for them to do that, which is what social sharing buttons are for.
Here are a few popular tools that offer social sharing buttons to help you grow your blog traffic:
- Shareaholic: This works with most blogging platforms, including Blogger, Wix and WordPress. It allows you to create share buttons for over 80 social networks and to customize the buttons and their layout.
- You can also add Follow Me buttons to encourage visitors to follow you on social media.
- Sumo: SumoMe offers several free tools to help you grow your website traffic, one of which is their social sharing bar. It’s supported by all major blogging platforms and works well on mobile devices.
To encourage your blog visitors to come back again and again, it’s a good idea to add a subscription box and RSS feed to your sidebar. In WordPress and Blogger, this can be easily done by adding the appropriate widgets.
- Directions for adding an RSS feed to Blogger
- Directions for adding an RSS feed to WordPress.com
- Directions for adding an RSS feed to WordPress.org
- Directions for adding an RSS feed to Wix
Step 6: Add your blog to your website
As I mentioned in the introduction to this article, two benefits of having a blog are that a blog can help bring more traffic to a website and it can help a website rank higher in Google search results through SEO.
But for a website to experience these benefits, the blog has to be attached to the website as a page or subdomain. So if your website is www.mywebsite.com your blog could be www.mywebsite.com/blog or blog.mywebsite.com.
The process for doing this may be a little complicated so if you have someone managing your website you might want to ask them to add your blog for you.
Step 7: Add Google Analytics to track activity
This step is an especially important one, and unfortunately, it’s often overlooked by many new bloggers. After you go through the effort of setting up a blog, writing articles, and then sending those articles out to the internet, you’ll want to know the results of all this hard work.
Are people visiting your blog? Are they reading your articles? How much time are they spending on your blog? Are they visiting your website afterward? How are people finding your blog?
These are just a few of the questions that you’re going to want answers to and those answers are going to be collected through your analytics. Without analytics you’ll be marketing your business blindly, not knowing if all your effort has been paying off or not.
There a many different analytic tools but I’m going to concentrate on the one that’s most widely used Google Analytics.
Getting Started with Google Analytics
If you have a Google account that you use for Gmail then you should set up your analytics with that account. If you don’t have a Google account then open one up.
To set up your analytics go to Google Analytics and click on the link that says Sign In, in the top right-hand corner.
Select Google Analytics from the drop-down menu and when you get to the next screen (as seen below) click on the Sign-Up button.
The next page will ask you to fill in some information about your account and your blog as well as some security questions about who Google can share your data with.
Once you are finished filling out the page you will get a tracking number to install on your blog.
Adding the code to your blog is pretty simple. If you’re using WordPress.org then you can do it with a plugin like Yoast. If you’re on Blogger then you just add your analytics code to your settings.
To add Google Analytics to Wix or WordPress.com you will have to upgrade your account.
Step 8: Define your niche and target audience
Now that you have your blog all set up you’re almost ready to start writing blog posts. But first, you need to define your niche.
Why should you define your blog’s niche?
Defining your niche will help you decide what kind of topics you will be writing about and who your audience is that will be reading your blog posts.
It will also prevent you from straying into other topics that fall outside of your niche and which may confuse people who visit your blog and expect to read about a particular topic.
How do you decide on your blog’s niche?
Since you created your blog to help grow your business then presumably you will be writing about topics related to your business.
For example, if you’re a plumber then these are some subjects that you might write about:
- Common plumbing emergencies and how to deal with them.
- Frequently asked questions about plumbing.
- Tips for saving money in the home.
- Preparing your home for winter weather.
It’s important to remember that your blog posts should provide value to your readers. No one is going to want to visit your blog just to read about you and your business. But if you are providing helpful tips and information that your audience can use then they will keep coming back to read more.
And not only that but when your reader’s toilet explodes and they need a plumber to fix it, you are the one that will come to mind because you have regularly proven yourself to be knowledgeable about plumbing.
Who’s your audience?
Knowing who you want to read your blog is also important because you will be writing your articles with these people in mind.
If you already have a clear picture of your business’s customers then you can extend that profile to your blog readers, because that’s who you want to attract to your blog.
You will also want to consider very carefully what these specific people want to read about so that you can write about those topics.
It can be helpful to sit down and write out a profile for your target audience.
- Are they men or women, or both?
- How old are they?
- Where do they live?
- What’s their income?
- What are their interests?
Compiling this information will make it easy for you to clearly imagine who you want to reach with your articles, and will also help you later on when you are deciding how to promote the articles on social media.
Step 9: Research keywords
The next step in your preparation for writing blog posts is learning to research keywords. Keywords are those words that people use when searching Google, or another search engine, that brings them to your blog or website.
Some keywords get searched thousands of times a day while others may just get searched a few hundred times.
Your goal, when writing a blog post, is that when someone searches on Google for the topic that you are writing about, your article is one of the first ones they will find. You want to be the person whose article about moving antique furniture shows up as one of the very first results.
In order to make that happen, you have to research popular keywords related to your business and write articles using those words or phrases.
Here are three tools that you can use for researching keywords:
- Keyword Planner
- Google Trends
- Wordtracker
You can also research what keywords your competitors are using and try to rank on Google for those same keywords, using a tool like SEMRush. Take a look at this article for more information on researching keywords and using them in your blog posts.
Step 10: Create a content calendar
Not having a publishing schedule can be the downfall of a blog, even a successful one. A content calendar ensures that you’re always prepared for the next week’s posts and that you aren’t fumbling at the last minute to think of something to write.
Your schedule will also determine how frequently you post on your blog, which will give both you and your readers a sense of consistency.
Here’s how to create a content calendar:
- Decide how many times a week, and on which days, you want to publish on your blog
- Using the keywords that you researched, create a list of topics to write about.
- Open a spreadsheet and list the dates for the upcoming month. Assign a topic to each of the days that you will be publishing a blog post. If you want to get even more organized you can brainstorm specific article ideas for each topic and assign those to each day that you will be publishing.
- Determine how long it will take you to write each article and make notes for yourself on the calendar when to start working on them.
And there you have it! Your content calendar is ready and you can now begin writing.
Step 11: Write a blog post and publish it
- Use a catchy headline that will grab your readers’ attention.
- After writing your headline put it into the CoSchedule Headline Analyzer to see how effective it will be.
- Create an eye-catching image for your blog post. Use Canva to easily design fantastic images
- Add the Eye Dropper extension to your browser to help you pick just the right colors for your images.
- Find gorgeous free photos for your blog post at Unsplash and Pexels.
Congratulations! You just took your first step toward generating more traffic and leads. But your work is not over. Your blog is here but no one knows about it yet – now, you’re going to have to start promoting it!
Blogger outreach tips for beginners – How to make a name and grow your traffic
When you are a blogger, building quality relationships with other bloggers is a lot more important than you think. As my mentor, Jon Morrow likes to say… “It’s not what you know, it’s who you know online that matters”.
So, optimizing your outreach to create new connections should have a significant spot in your content marketing strategy.
Outreach is an incredibly effective method for increasing your blog traffic. It is the prime way I bring new readers to my blog. And it can be a first-rate approach for you, also.
Here are the 3 lessons you can benefit from today on blogger outreach.
1) Forge genuine relationships with other bloggers
Don’t befriend another blogger because they are famous. Instead, connect with them because you like their work, respect them, and believe that they can truly help you broaden your connections in a mutually advantageous manner.
Before you even ask another blogger to help you, make the first move. Find appropriate posts of theirs to link to by subscribing to their blog. If you find a post that you particularly like, write your own post sharing your opinion about the same topic and provide a link to the other blogger’s post.
Remember, quality links, and relevant posts will help your readers and your ranking. It’s wrong to assume that linking will ruin your Google PageRank or traffic.
On the contrary, your readers will surely love you for pointing them to other valuable articles through a quality external link. Aside from linking to them, you can also help your future BBF (best blogger friend) by:
- Referring other people to their blog
- Nominating them for an award
- Recommending them for an interview or podcast
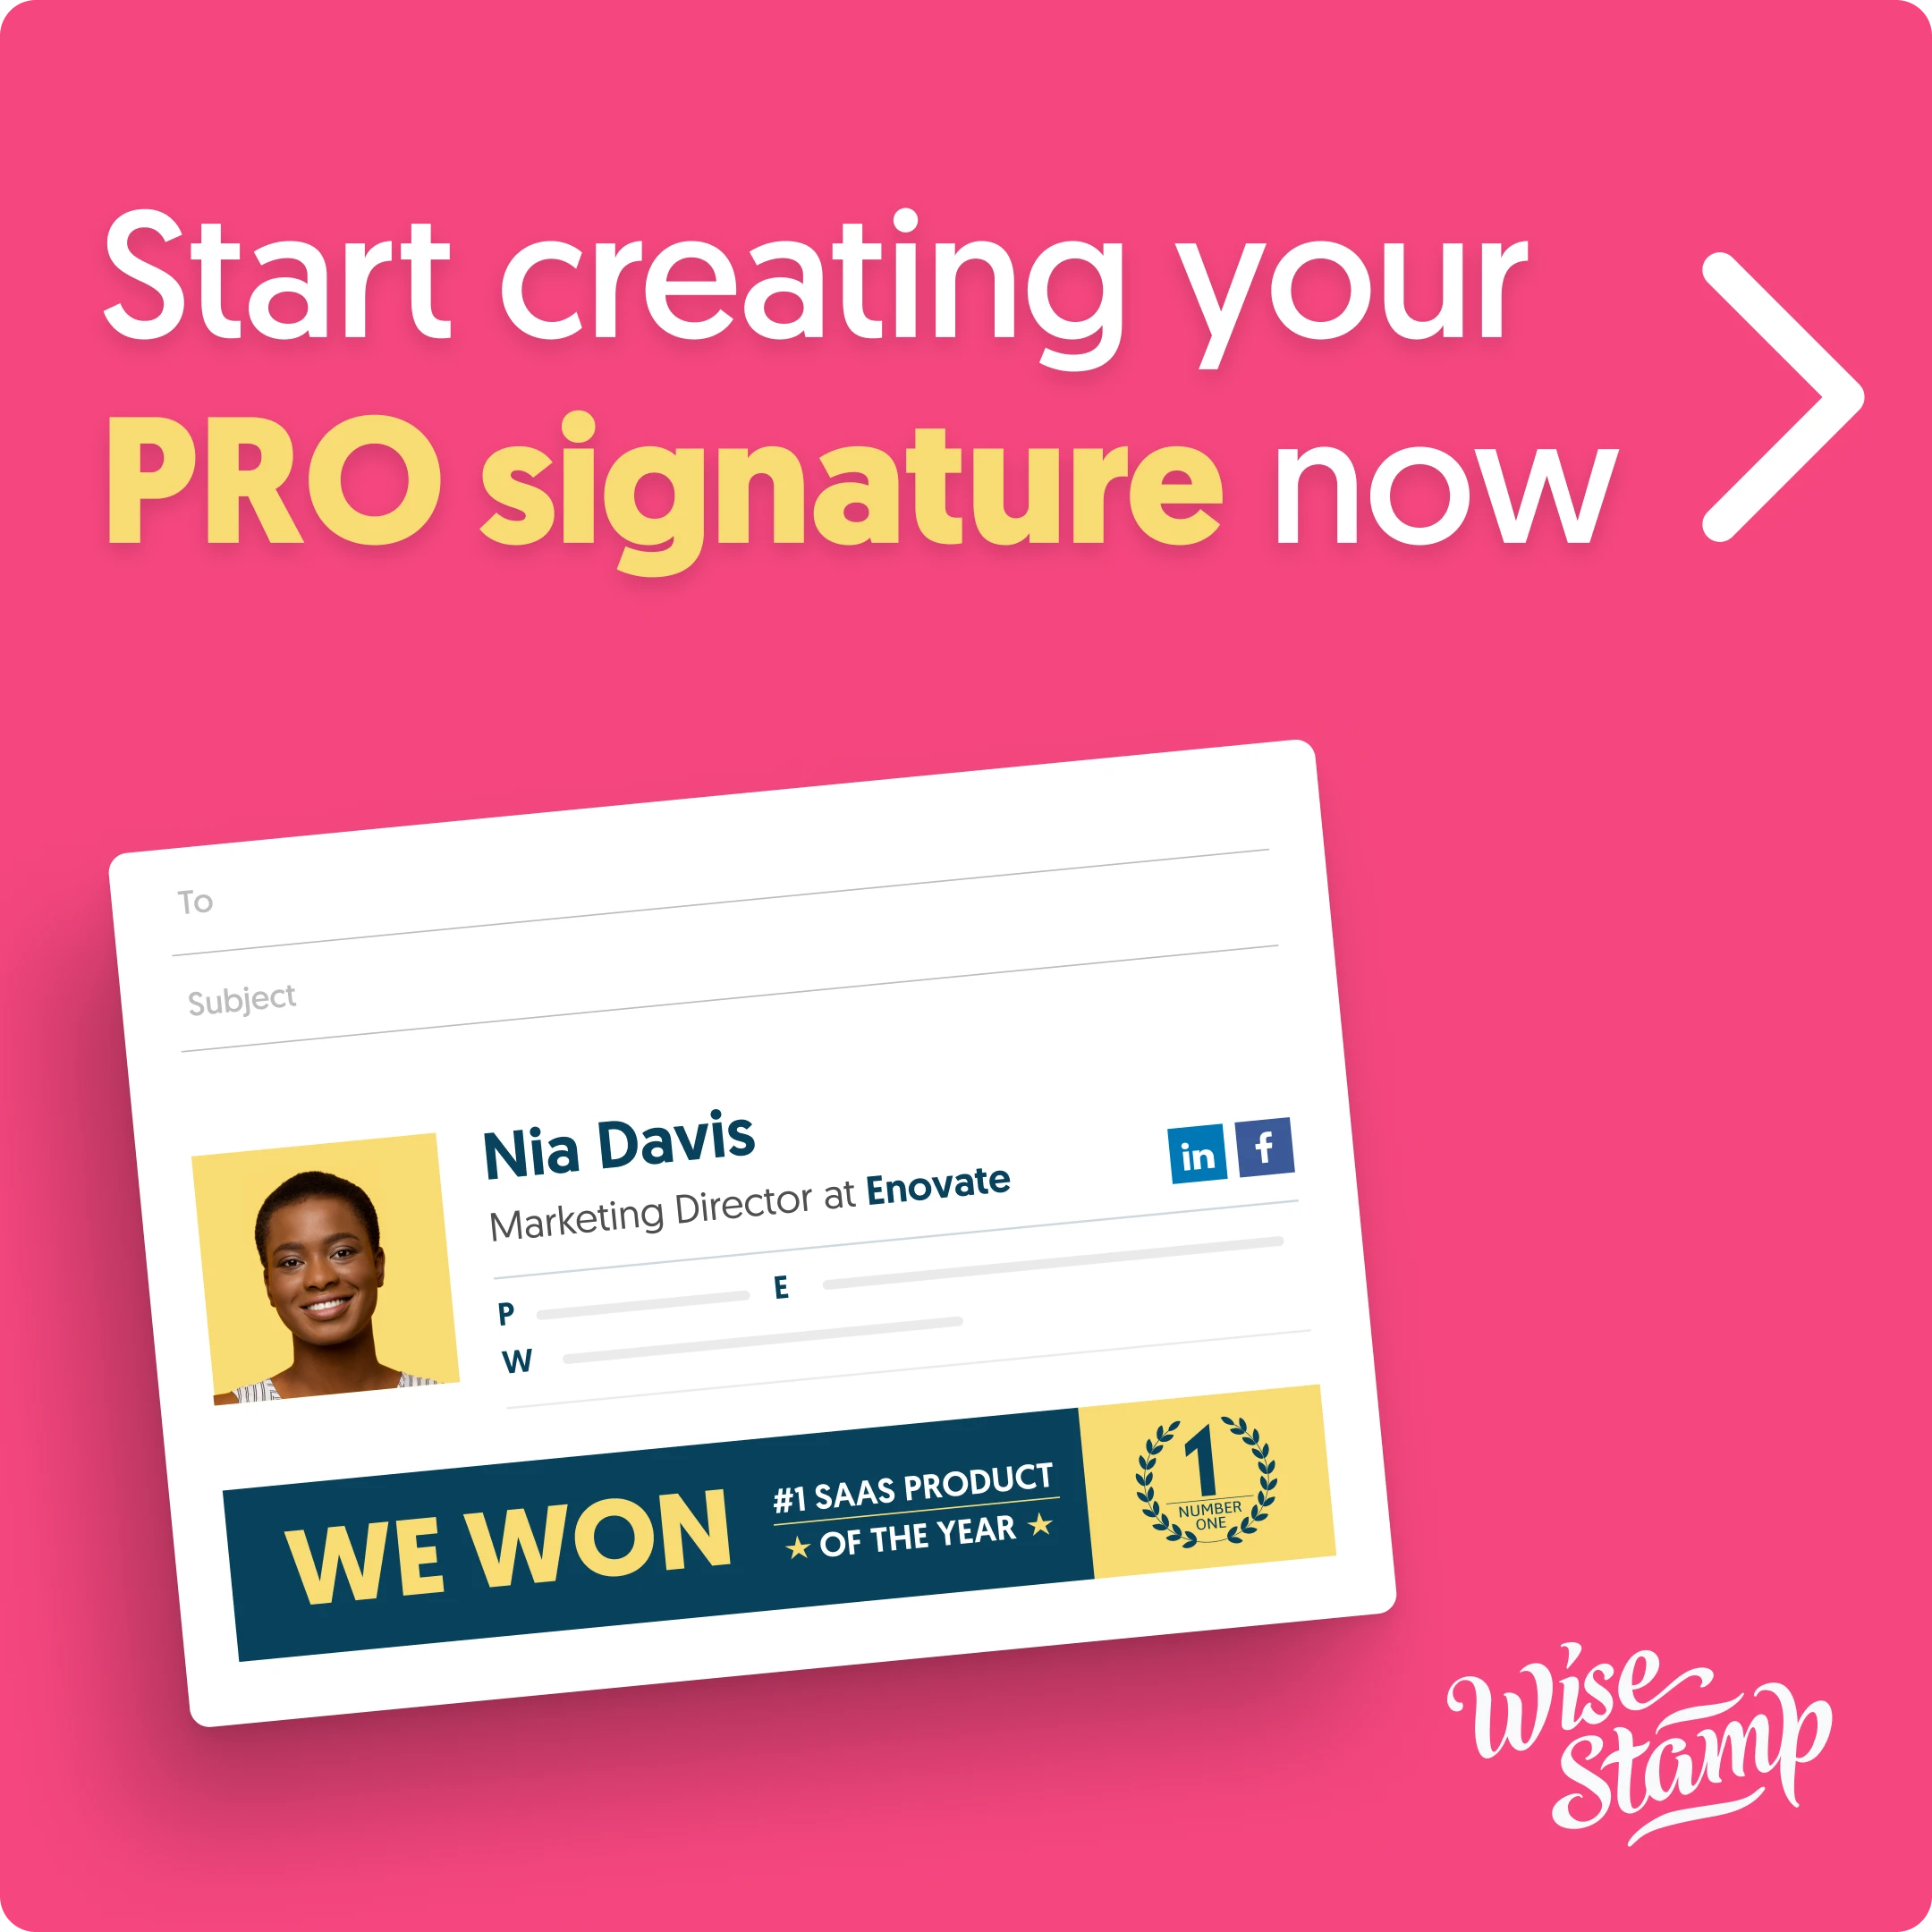
- And sharing their posts on social media (and via your blogger email signature)
These actions will prove you want to get to know them better, leading to the beginning of an excellent relationship.
2) Use comments and guest posts to get your name out there as an authority
It’s not enough that you write great content. You need to promote that content to increase your exposure to new readers and to gain more subscribers.
Here are my favorite two ways to promote my posts.
Write Blog Comments
I wish I knew early in my blogging career about promoting your blog through blog commenting. I would have grown my blog faster by using this brilliant method of blogger outreach.
The key? Choose blogs that are relevant to yours and leave helpful, funny, or even (somewhat) controversial comments to pique the interest of the audience of that blog.
These readers will likely be interested in your content too since they found you after reading a blog relevant to yours in the first place.
To ensure that you will hook readers in following your comment over to your site, start by posting comments on as many similarly niched blogs as possible, creating at least 2 blog comments per day.
And remember, each of your comments must add information or raise a question about the topic being discussed. Don’t write a useless comment, like “Great post!”.
Guest Post Blogging
This is a popular practice in the blogging world, where you offer to write an article for another blogger. The other blogger gets a free article, while you, the guest blogger, get more exposure.
You can also gain traffic for your blog by including your link in the byline of your guest blog posts. I also indulge in “reverse” guest blogging. That’s where you have other bloggers write a post for your blog.
This is great for 2 reasons: 1) it gives you some time off and 2) it helps during stressful times or even vacations. Plus, your audience gets a different point of view on a subject near and dear to their hearts.
3) Promote your killer content
You can capitalize on your very best articles to further promote the post. This is how I show my clients how to do blogger outreach:
- Inform other bloggers about your new post by email (but only after commenting on their posts for at least 3-4 weeks).
- Post your articles in your social media accounts and ask for retweets and reposts.
- Ask your friends to vote for your articles on social bookmarking sites.
- Create a round-up post where you ask influential bloggers the same question, like a group interview
I know you are thinking, “I just can’t write an email asking an influential blogger to share my post!” Yes, you can.
Just casually mention in your email that you just wrote an article that they might like and if they do like it, would they mind sharing it. With a straightforward message like that, the other blogger just might read your article and, if they like it, they won’t hesitate to share it.
But if they don’t, it means that you need to put in some more work to create compelling articles that will easily earn the links and shares of the other bloggers in your network.
Takeaways
- Taking part in blogger outreach is important if you want to grow your readership.
- Having blogger friends helps you get more traffic and subscribers.
- Guest posting and commenting help you build authority in your niche, generating both income and amassing a huge following of super fans.