Setting up a lovable brand page on Facebook 2024
Creating a brand in Facebook - full guide. Here you will find all you need to know about setting up, promoting, and advertising a successful Facebook brand page
This guide will walk you through creating a brand page on Facebook that people can’t help but love.
In this article, you will find all you need to know about creating a brand page on Facebook and therefore greatly improving your Social media marketing efforts. In addition, there are a few tips littered around the article, along with a few points on making your first social media posts. The instructions below will take you step-by-step through the branding page creation process.
Step 1 – Choose page type
The first thing you’ll need to do is go to the following link to start the process of adding your business page to Facebook.
When you arrive on the page, select one of the 6 choices:
- Local business or place
- Company, organization or institution
- Brand or product
- Artist, band or public figure
- Entertainment
- Cause or community
The choice you pick will govern what type of page you are allowed to create. It will also govern the way that Facebook will handle your page and the traffic it sends to your page. You can change your category at a later date if you wish.
Should you choose a business or brand?
If you have a local address and you are expecting a footfall, then choose a business because it comes with a map on the main page. If you sell products or services over the Internet, then pick Brand because it puts little emphasis on the location of your business and puts more emphasis on social sharing.
Step 2 – Add brand description
After selecting your category, you can enter a descriptive sentence or two about your brand and enter the URL of your website. If you decide to choose a business category, then you may also add category tags and mention the sorts of things your business sells.
Fill out the “About Your Page” section
You have to enter up to 155 characters to briefly describe what your branding page is all about. Give this description a lot of thought because it will appear at the top of your Facebook brand page. First impressions are sometimes given directly via your “About Your Page” description.
For example, if you write something inappropriate, then that is the first thing that some people will see when they visit your brand page, which may create a wrong or undesirable impression.
How to get the best results for your “About” description:
- Spend a lot of time on your About Your Page description
- Be as concise as possible
- Consider simply adding your brand’s tagline if you have one
- Promote at least one of your brand principles or selling points
- Do not try to cram in several selling points
Step 3 – set up your page URL
Facebook lets you define your page URL slug (the end of the URL after the last slash). Facebook calls this a vanity URL.
For example, if your business is called Fuzzy Socks, your Facebook URL may be facebook.com/fuzzy-socks
Step 4 – Add a brand logo
You may also upload a profile picture. Your profile picture is the picture that will appear whenever you comment while logged in through your Facebook brand page.
It may be a good idea to upload your brand logo as your profile photo. However, if you are looking to improve and extend your influence, then a picture of yourself may be more suitable. You may even like to add a photo of yourself with your logo appearing in the background or in the corner of your profile image.
- Take the time to pick a very good profile picture
- Make sure it accurately represents the brand you are promoting
- Consider adding your logo as your primary profile image
- Try to sneak your logo or tagline into your profile photo
- Make your image at least 180 x 180 pixels
Note: Facebook forces rectangular images into square images
Step 5 – Add a cover image to your brand page
It is finally time to start decorating your brand page in a way that allows your visitors a glimpse at what your brand is all about. Your first job is to create a cover image.
- Try to make the cover image the same size or bigger than 851 x 315 pixels
- Pick an image that represents your brand and its principles
- Try to avoid one product as a cover image unless your brand is known for it
- Remember that your cover image sets the tone for your entire brand page
- Try to center your image to make it mobile-friendly
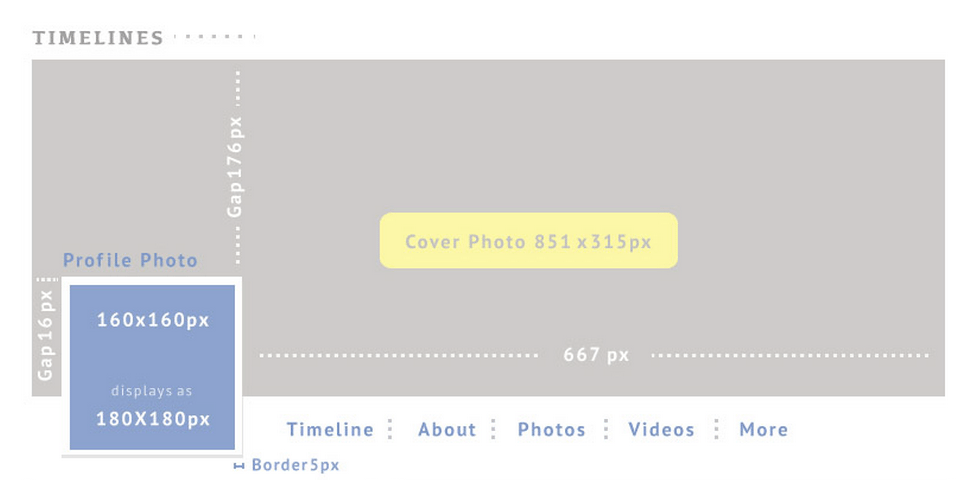
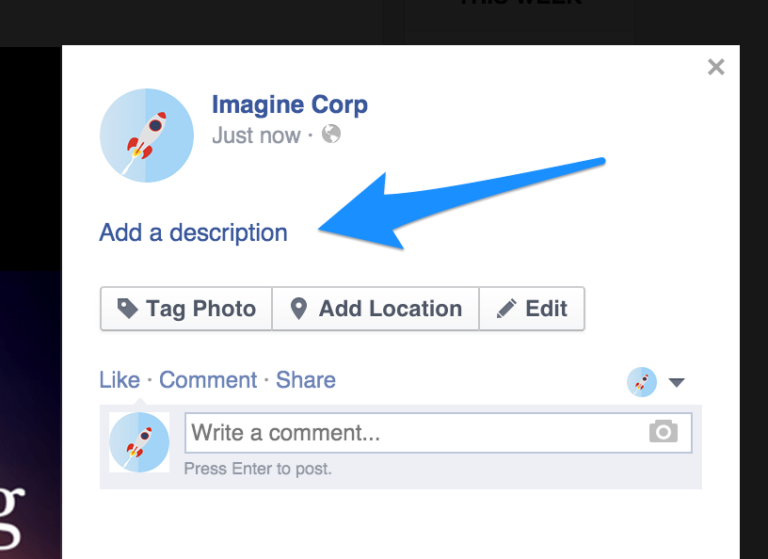
Take a look at the image above to see where your image will appear and what sizes you need to reach in order to stop the Facebook software from magnifying your image and making it look terrible.
How to get the best results for your cover image:
- Move your image after uploading to be sure it is in the right position
- Use Photoshop, Canva, PicMonkey or BeFunky to create your cover image
- Some Brands routinely swap their cover image for a bit of a change
- You may create different cover images that have different offers
- Give your cover image a description by finding it in your timeline
Make sure your cover image is optimized for mobile devices
Check how your Facebook cover image looks when you try it on a mobile device because it may look a little wrong.
Don’t forget that most people use their phones to access Facebook, so you need to make a good impression of your brand image by validating that it looks just as good on mobile as it does on desktop.
The image comes out as 563 x 315 pixels when it appears on a mobile device, so try to center your image to be sure it doesn’t look silly on a mobile device. You don’t want the corners of your image chopping off, and you don’t want only a portion of your image appearing when people visit you with their mobile devices.
Step 6 – Add collaborators to work on your brand page as a team
Since you are marketing a brand on facebook, you may like to add collaborators to your brand page. You may add an admin person, an editor, a moderator, an advertiser, and an analyst.
Go to the page roles section add in the name of the person on Facebook and assign that person a role. That person’s account will then grant them access to the brand page’s role and all the privileges it allows. You may also add roles by adding in the email address of the associated Facebook account.
Step 7 – Publish your first post
The publication of your first post is the final step for creating your brand page, and it may become a recurring activity on your brand page. Making a post on a brand page is almost identical to making a post on any Facebook profile page. You may add images, links, videos, and text to make your posts more interesting.
A repeated and/or sustained content campaign and/or a lively and dynamic group of commenters on your brand page will help entice other people in and encourage them to return to your brand page.
Strongly consider adding a fair number of images, as they appear to generate 2.3.x more engagement than posts without images. Live video will rank higher and usually on top of people’s news feeds while the live event is occurring, which should encourage you to post live video feeds whenever the highest number of your target audience is using Facebook.
Post things such as special offers, sale information, discount codes, and tips to help people work through their content more easily. People who have brands on YouTube may post videos on Facebook whenever they publish a new video on the Facebook social media network.
Step 8 (Bonus for personal brands) – Connect your brand page to your profile page
Here is where the process becomes a little trickier. The Facebook system is going to ask you to add your new brand page to your main Facebook profile. It will also ask you to set up a new advert for your brand page. These are both fine options, but you can attend to them later.
Clean up your profile page
Filling out your profile is the next thing you should do. Part of the reason is that some people may try to do a little research on the person behind the brand and they may land on your Facebook profile page.
Such people may check out your profile bio to look for trust signals before they feel comfortable buying from you. It is imperative that you add concise, correct, and reassuring information into this section.
Access the “Page Info” function by going to “Settings” and clicking the “Page info”.
Enter your start information and tell people where your company, product, or brand was started or launched. It appears on your history timeline and it appears as an update on your main feed.
Fill in the mission and link description by adding information that further explains your agenda. Some people use it as the overflow for what they would have written on their main brand page description. Adding extra information may help improve your rankings on search engines. You may enter up to 155 characters.
There is another slot to enter your phone number and your email address. In most cases, it is not a great idea to add your phone number and email address into a public forum such as a social media network. However, since you are running a business or managing a brand, you may like to enter your business phone number and email address so that potential customers or associates may contact you.
The Required Content Of Your Page
The primary aim of your brand page is to educate people on your brand principles. Simply drawing attention, receiving likes, and getting shares is not enough, you have to teach people what your brand stands for and what they can expect when they do business with something, somebody, or a company that is related to that brand.
Promoting your brand page through Facebook advertising
Once you have a brand page set up it could be a good idea to start advertising it to get it out there. If you have a product or service to sell, you want to reach a massive amount of your target audience while keeping costs as low as possible. Luckily, you can find over 900 million daily active consumers on Facebook, which makes Facebook one of the best advertising channels for brands.
Actually, most eCommerce brands receive an average ROI of 152% from Facebook advertising, and one could only imagine the ROI of the brands doing exceptionally well.
So, ready to get started with Facebook Advertising?
Here are the steps to help you get going and a few expert tips.
The Foundation
In order to get a good grasp on how to start advertising on Facebook, you must first understand Facebook’s advertising structure.
The Facebook ad platform is broken into 3 levels: campaign, ad set, and ad.
- Campaign: Campaigns contains your objective and the corresponding ad sets and ads.
- Ad set: Ad sets contain your ad(s). Here you will choose your schedule, budget, bidding, targeting and placement.
- Ad: The creative you use makes up an ad.
Pre step: Power Editor vs. Manager
Facebook continues to make their advertising platform as easy to use as possible. There are two ways to start creating your ads on Facebook: Ads Manager and Power Editor. In the past, Facebook’s Power Editor came packed with a few extra features not found in Facebook’s Ads Manager, but recent updates have made the two equal in features. User experience and layout is now the only difference – choose the option that works best for you.
Step 1: Choose a relevant objective
When creating an ad, you must first select an objective. Choosing the right objective is important because Facebook will show your ad to the people most likely to complete your desired objective.
While Facebook has 10 objectives to choose from, only 4 are relevant to selling products on Facebook:
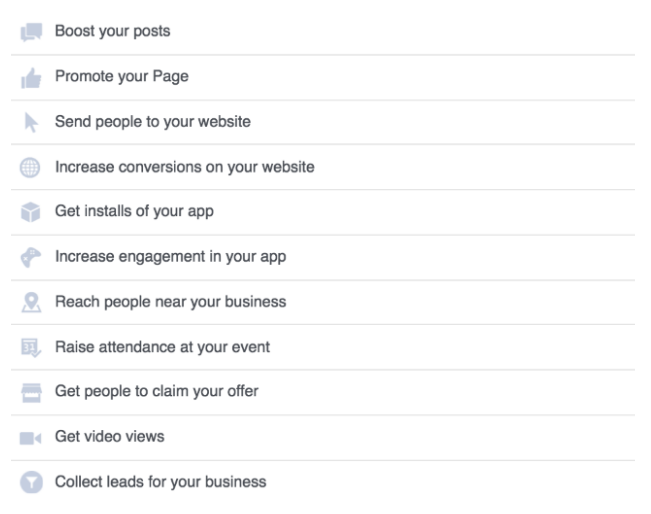
- Clicks to Website: Increase the number of visitors to your site.
- Website Conversion: Send people to your website to take a specific action, like buying your product.
- Page Post Engagement: Get more people to see and engage with your Page posts to increase shares, likes, and comments.
- Page Likes: Build a community of fans by getting more people to like your page.
- Leads: Create a form that will collect info from people without leaving Facebook.
The objective for website conversions is an e-commerce brands’ best friend. It requires you to place a pixel code on the Thank You page of your site, which tracks not only how many sales you have received from Facebook, but which specific ad is getting you the most conversions (sales) – the most important analytic.
Step 2: Select a budget and ad schedule
Facebook gives you two budgets to choose from: Daily Budget and Lifetime Budget.
Choose a Daily Budget if you would like to set a max budget per day for Facebook to spend. This is helpful to make certain of exactly how much you are spending each day.
Choose a Lifetime Budget if you would like to set a maximum lifetime budget for your campaign and want to let Facebook determine how much to spend each day to be most effective.
Begin advertising with a relatively small budget that will allow you to test and optimize your targeting and ad copy. Once you have the winning combination, invest more.
Step 3: Define Your Target Audience
With over 900 million daily active users, Facebook makes it entirely too easy to get your product in front of your target audience. While Facebook has a ton of great targeting options, it is imperative that you know how to narrow those options to your ideal potential customer.

Facebook targeting options include:
- Custom Audiences: Email addresses, phone numbers, website visitors, Facebook users IDs or app user IDs you have collected over time.
- Location: Countries, counties/regions, cities, ZIP/postal codes, addresses or Designated Market Areas ® to show or exclude your ad to people in those locations.
- Age: Minimum and maximum age of those who you want to see your ad.
- Gender: Choose whether men, woman, or both will see your ads.
- Connections: People who have a specific kind of connection to your Page, app or event.
- Language: Specific language(s) of your customers
- Interest: People who have a specific kind of connection to your Page, app or event.
- Behavior: People based on purchase behaviors or intents, device usage and more.
Be as specific as possible when using Interest Targeting by narrowing your audience with “and” targeting. For example, if you were selling golf equipment, you could specify that you only want to run ads to those with the interest ‘golf digest” and Charl Schwartzel and Callaway. Previously, Facebook viewed interest as only “or.”
Step 4: Create your ad
But first- here are a few things you should be aware of:
- 1200 x 444 is the suggested picture size for Page Like ads.
- 1200 x 628 is the suggested picture size for all other ads.
- Images are graded as OK, Low, Medium, and High. Ads ranked as OK contain the minimum amount of text (perhaps just the company logo) and will receive the highest amount of reach. Those ads with a high volume of text will be graded as High and are unlikely to be displayed at all.)
Get started with your ad with these steps:
- Go to Ads Manager and click “Create Ad.”
- Enter URL to promote.
- Choose the proper conversion pixel that corresponds with the product you are selling.
- Define who you want to see your ads.
- Choose to create an ad with an image, video, or multiple images.
- Enter an actionable and creative headline.
- Enter text that will let your potential customers know what the ad is about.
- Choose an optional call-to-action button.
- Enter a link description, used to emphasize why someone might want to visit your website.
- Enter in a display link.
- Place Order
When creating ads, take the time to create 3-6 different types of ads with varying images and copy. This allows you to see which graphic and copy combination your audience responds the best to and is getting you the lowest cost.
Step 5: Track and analyze results
You should be checking your ads once a day, at the least, especially if you are still a beginner with Facebook ads. Facebook Ads Manager allows you to monitor the results of your Facebook ad campaigns.
Amount spent, reach, cost per click, frequency, and costs per conversion are all metrics you should analyze for opportunities to optimize. Facebook also allows you to break down your results by age, gender, placement, and more. Use this data to optimize your ad sets to the best-performing demographics.
As soon as you can, pause all less-than-desirable ads and ad sets and allow the best of the batch to continue to run. Don’t waste money by allowing higher cost ads to continue alongside the ads that can get you more results for less money. If website conversion is your objective, the ad(s) that have the lowest cost conversion is the winner, not the ad with the lowest cost.
Good sales and good luck!